














Get to know WordPress user settings: how to edit your profile and personalise the admin panel
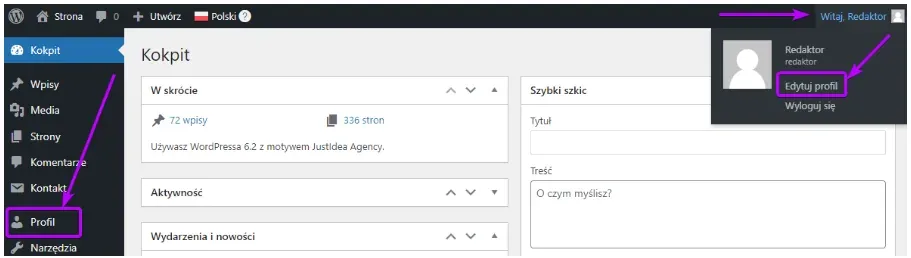
After logging in, you can access your user settings in two ways:
- hover over your username in the top right corner of the admin panel and select Edit Profile
- click the Profile button in the left-hand menu
In profile editing, you can, among other things:
- change the admin panel's colour scheme:
- turn the front-end toolbar on or off after logging in:
- change the admin panel's interface language:
- enter the user's first name, last name and/or nickname, define which of these values is displayed (e.g. in the top right corner of the admin panel), and change the email address linked to the account:
- change the password or log the user out of all active sessions (the second option is useful, for example, if you were logged into the admin panel on someone else's computer and forgot to log out):
Editing the admin panel interface
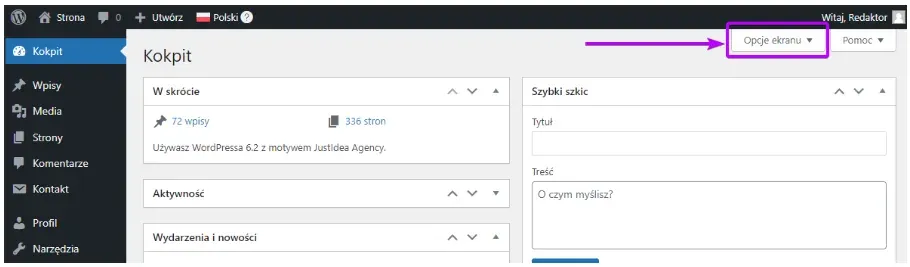
On many admin panel pages, a Screen Options tab is available in the top right corner, letting you turn certain interface elements on that page on or off.
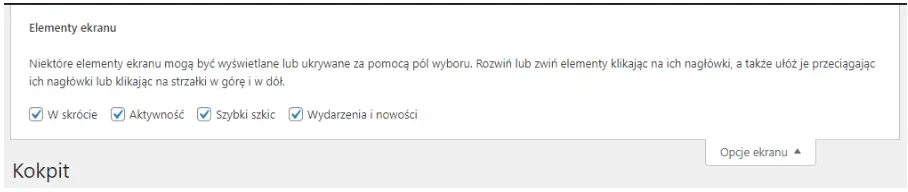
For example, on the admin panel's home page (the so-called Dashboard), you can turn the following widgets on this page on or off:
On some pages, you can also change the position of certain elements using drag and drop.
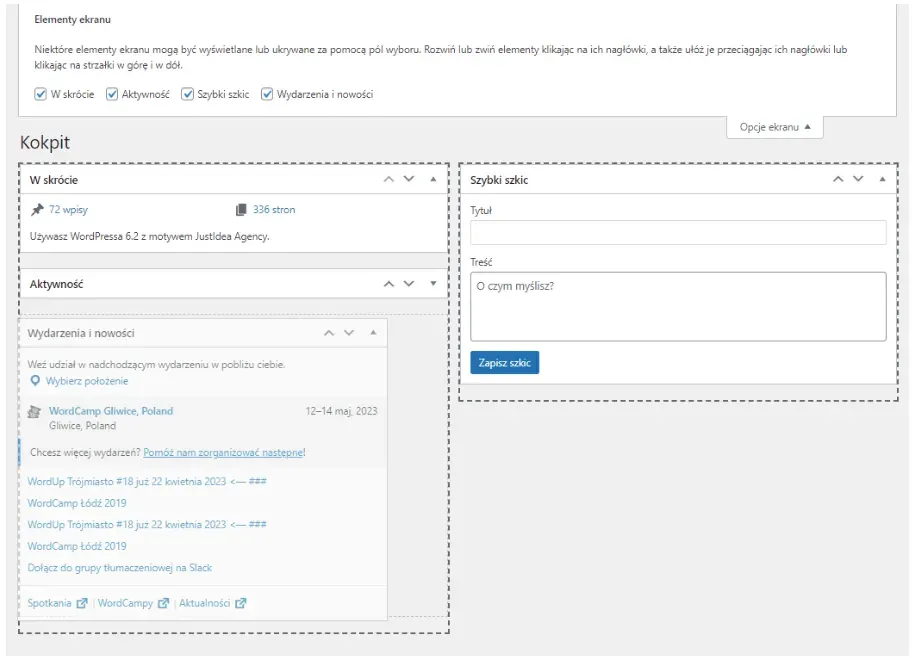
Many widgets also have three arrows:
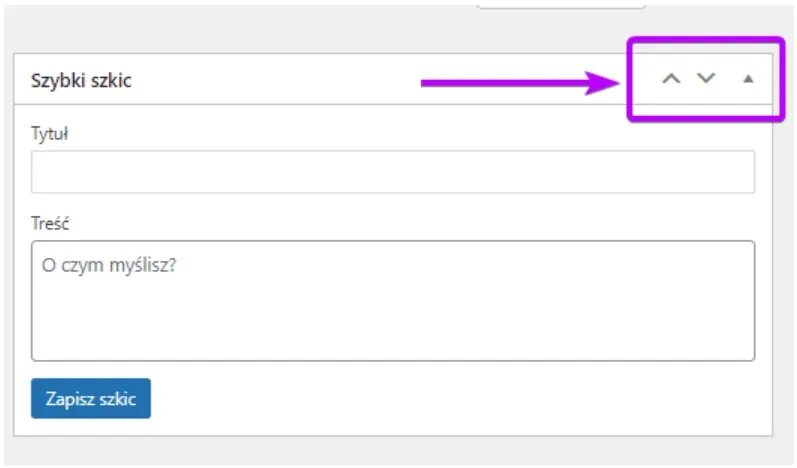
The first two arrows define the element's position on the page: they move the widget ahead of an earlier widget or behind a later one.
The last arrow collapses or expands the widget.

How to edit navigation on a WordPress site: adding, removing and reordering menu items
In the admin panel, in the left-hand menu, select Appearance > Menus.
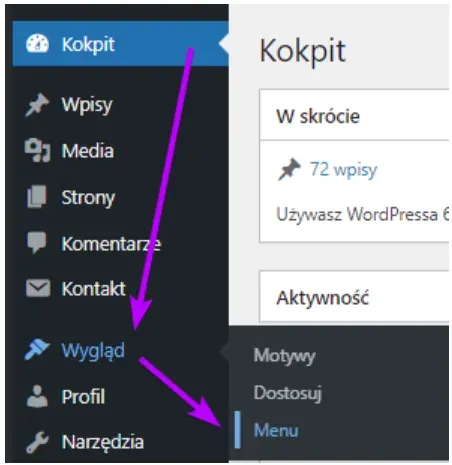
NOTE!!! If you cannot see these tabs in the admin panel, consult our web developer.
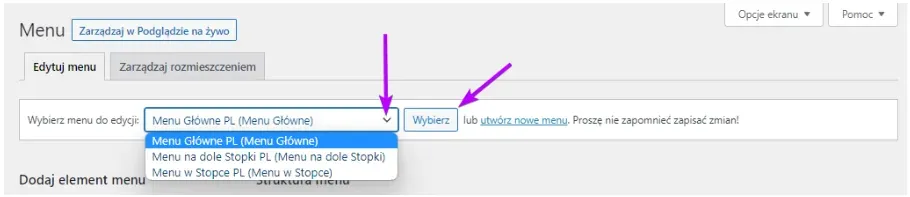
Choosing which menu to edit
At the top of the menu editing panel, choose which menu you want to edit and confirm your choice with the Select button. This same panel also handles sales if you're running WooCommerce stores, which we build and maintain.
Screen options
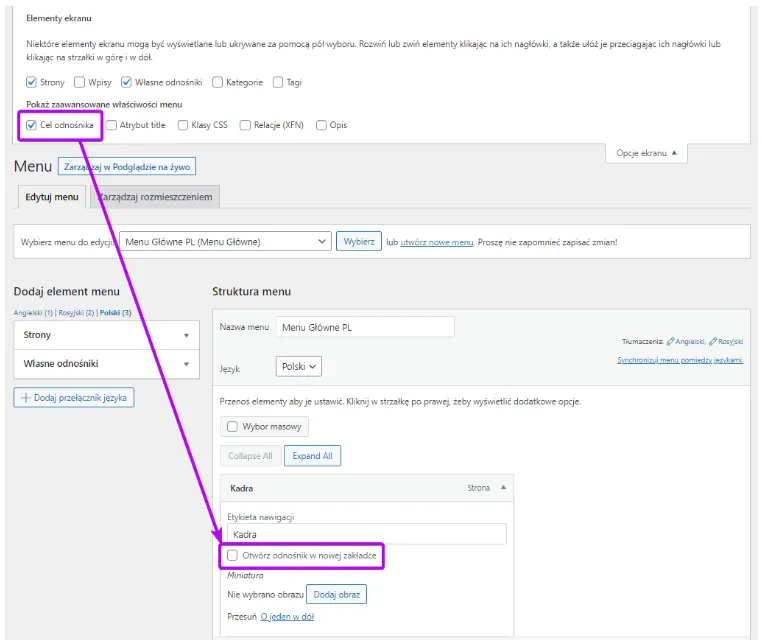
You can add your website's pages, blog posts (if any exist), custom links and a few other elements to the menu. The visibility of the item types available to add to the menu is defined in Screen Options.
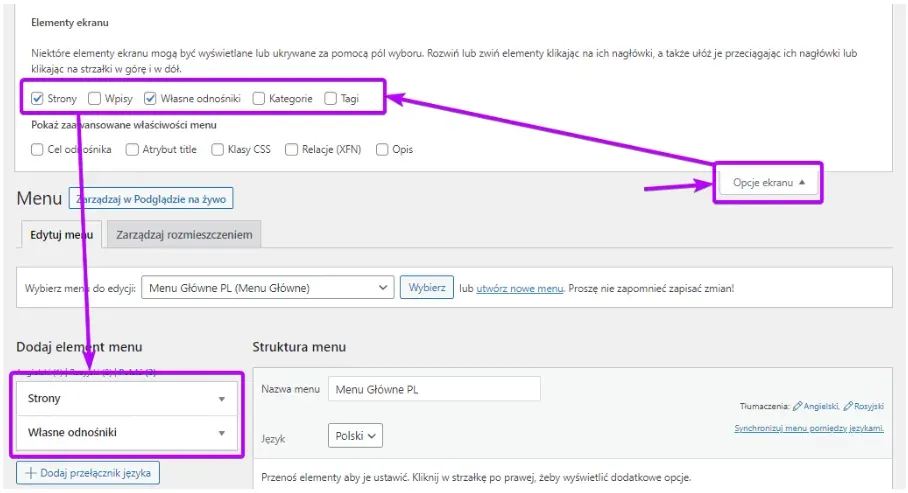
If you want some menu items to open in a new tab, you can enable Link Target in Screen Options, which lets you define this property for each menu item.
Adding a page or blog post to the menu
Go to the panel for adding that type of item. If the panel is collapsed, expand it by clicking the arrow next to the item type's name.
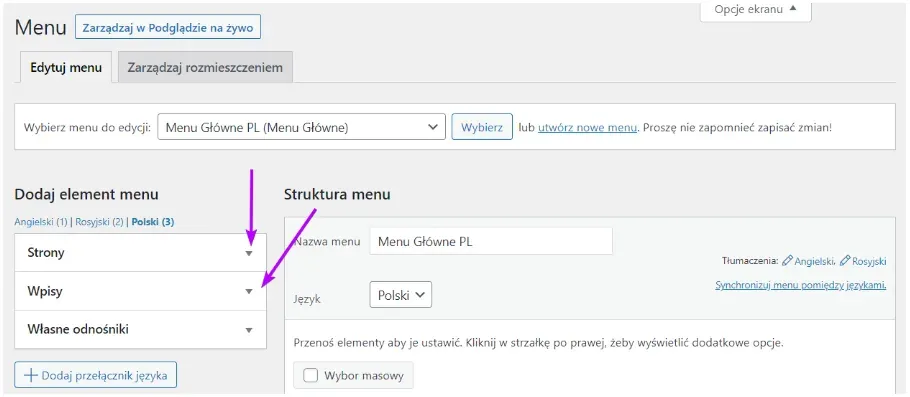
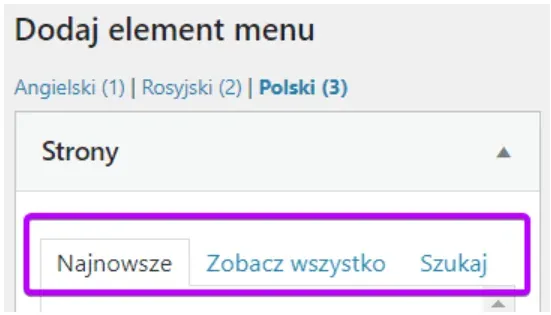
For both pages and posts, three tabs are available in the panel for adding an item to the menu:
- Most Recent: shows the most recently added pages or posts
- View All: shows all pages or posts
- Search: lets you search for a page or post
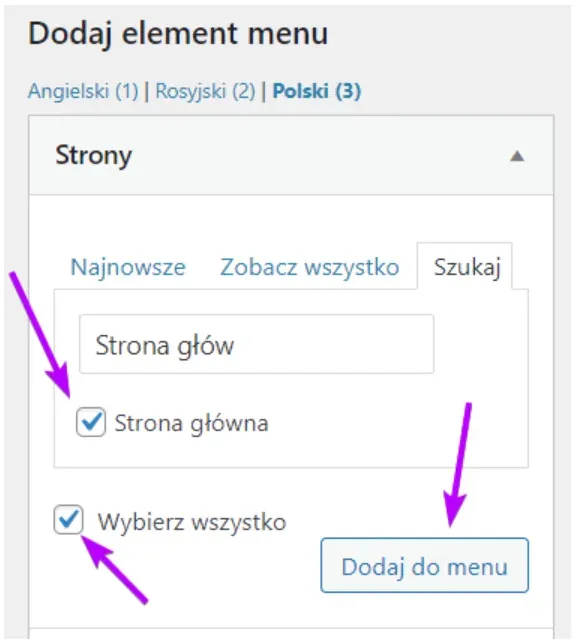
To add an item to the menu, tick the checkbox to the left of that item.
You can also tick the Select All checkbox, which selects every item currently visible in the panel.
Clicking the Add to Menu button adds the selected pages or posts as the last items in the menu.
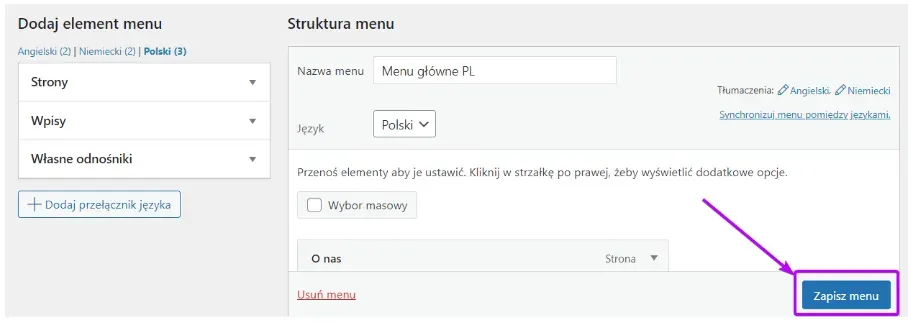
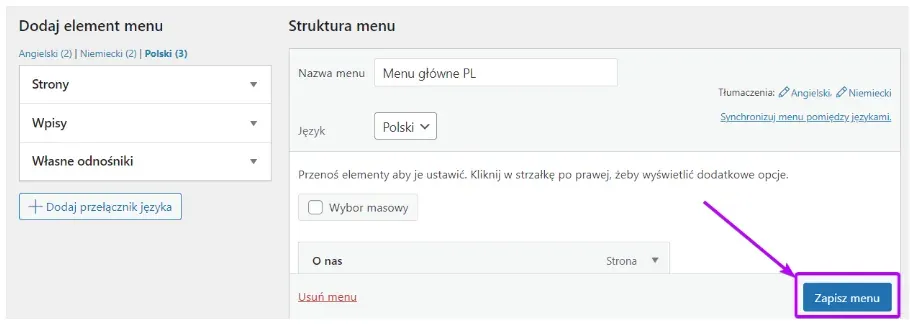
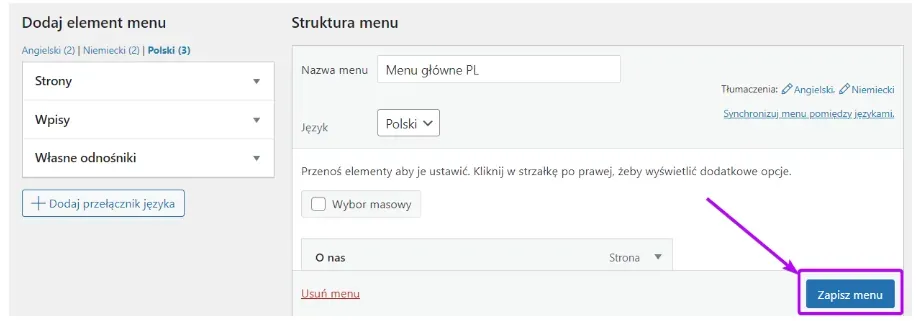
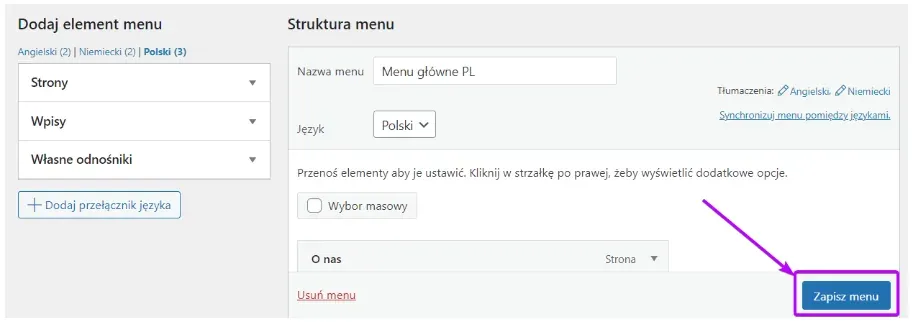
For the added items to become visible on the site, click the Save Menu button.
Adding custom links to the menu
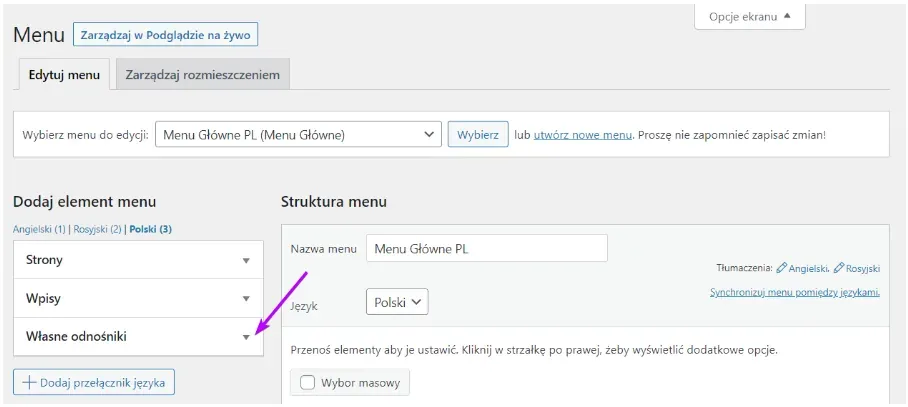
Go to the panel for adding custom links. If the panel is collapsed, expand it by clicking the arrow next to Custom Links.
In the URL field, enter the address the menu item should point to. It's important that the URL is complete, i.e. it starts with https://
In the Link Text field, enter the text that will appear in the menu.
Clicking the Add to Menu button adds the link as the last item in the menu.
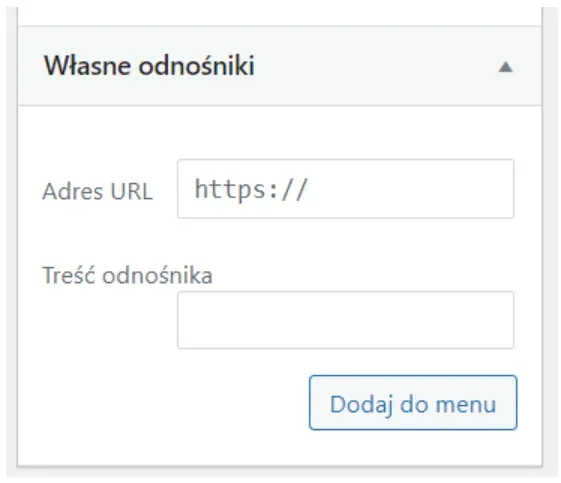
For example, if you want an item called Interactive Agency to appear in the menu and point to justidea.agency, enter https://justidea.agency in the URL field and Interactive Agency in the Link Text field.
For the new item to become visible on the site, click the Save Menu button.
NOTE! Use the Custom Links panel only for pages that are NOT pages on your own website. Pages on your own site should be added using the Pages panel described earlier (or Posts, for blog posts). This is because items added via Pages or Posts are relative links, meaning that if such a post's URL changes, WordPress automatically updates that address in the menu too. Items added via Custom Links have no such safeguard.
Editing menu items
To see a menu item's properties, click the arrow next to that item.
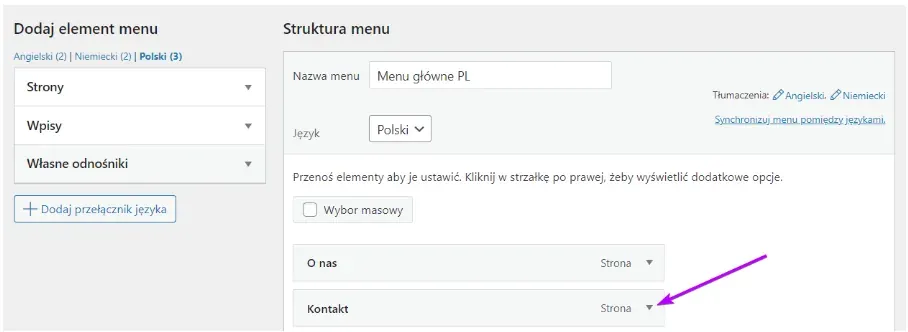
Once the item is expanded, you can edit the text displayed in the menu in the Navigation Label field.
For Page and Post type items, the Original field shows the original title of the page the menu item points to. This title is also a clickable link to that page.
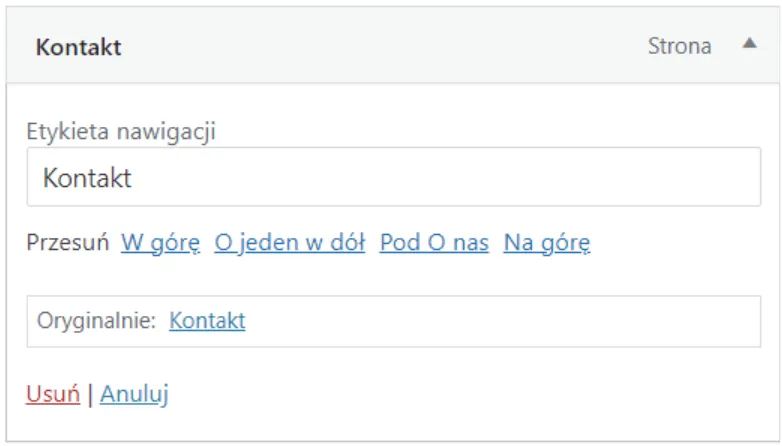
For Custom Link type items, a URL field is available, letting you edit that item's URL.
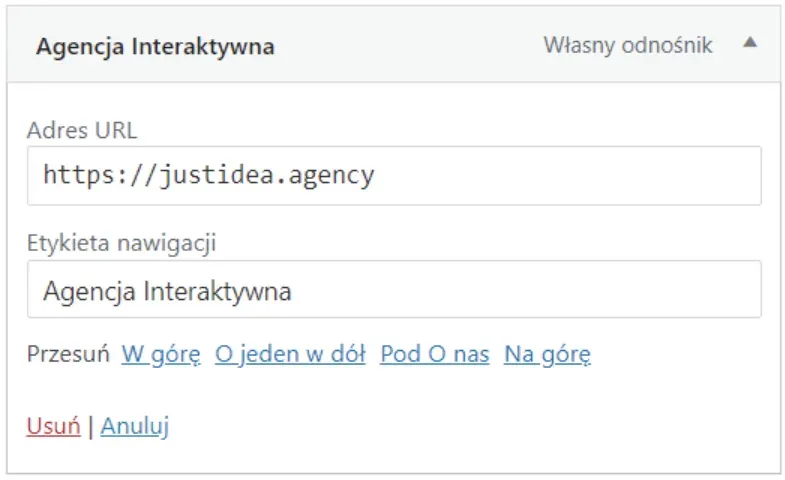
The Remove button deletes that item from the menu.
The Cancel button closes the editing of that item.
For your changes to become visible on the site, click the Save Menu button.
Editing the order of menu items
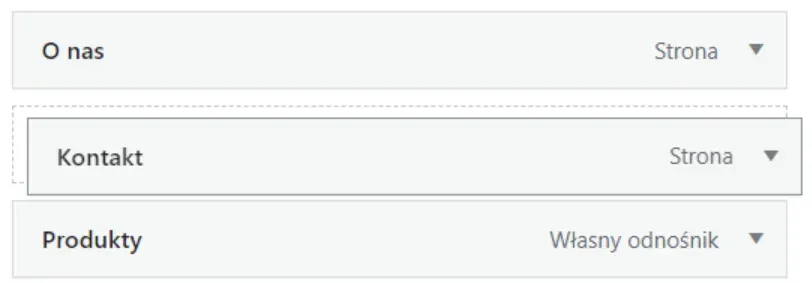
You can edit the order of items in two ways.
The first is drag and drop.
The second way is to expand that menu item's editor and use the buttons in the Move section.
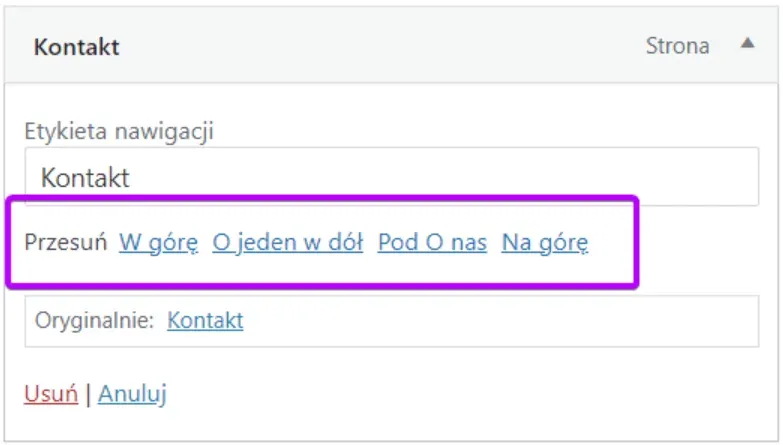
The Up and Down One options move the item one position earlier or later in the menu structure. The Move to Top option makes that item appear first in the menu.
The Under [name of the item above the item being edited] option moves the item you're editing into the submenu of the item above it.
NOTE! Some templates don't have a submenu designed into them. If your template is like this and you still place an item in another item's submenu, it may not display correctly!
For the changes to become visible on the site, click the Save Menu button.
Different language versions of the menu
If your template supports multiple language versions, you can switch to editing the menu in another language in a few ways:
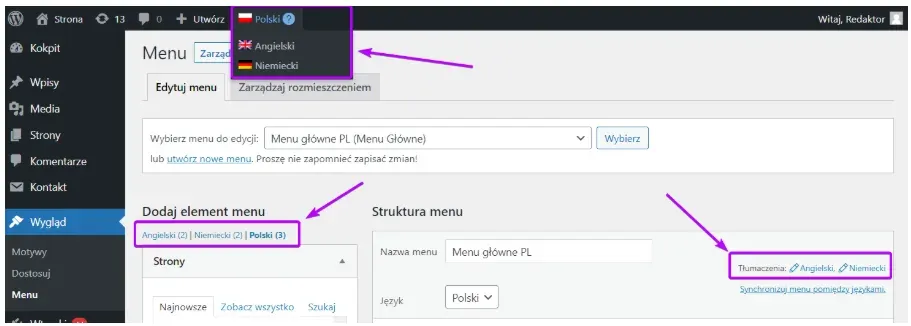
NOTE! We don't recommend using the menu synchronisation option between languages, as it can result in some menu items from one language being replaced with items from another language (for example, links to Polish pages appearing in the English menu).
Blog posts in the WordPress panel: a guide to managing content
Adding a new post
You can create a new post in several ways.
- In the top toolbar, select New > Post
- In the admin panel, in the left-hand menu, select Posts > Add New
- In the admin panel, after going to the Posts page, click Add New
- On the admin panel's home page (Dashboard), in the Quick Draft widget (if the widget's visibility is enabled in Screen Options) NOTE! This option lets you quickly enter a title and unformatted post content and save it as a draft, but it does not let you publish a new post!
Browsing posts
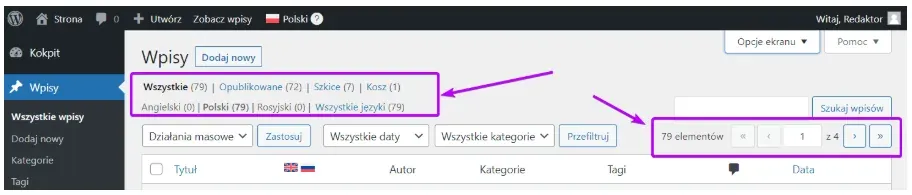
To see all posts on the site, click Posts in the admin panel's sidebar menu, or select Posts > All Posts.

By default, the posts page shows the 20 most recent posts with the status Published or Draft (if there are more than 20 posts, you can reach the rest using pagination).
If the site has several language versions, only posts from the currently selected language version will be shown (you can read more about language versions later in this guide).
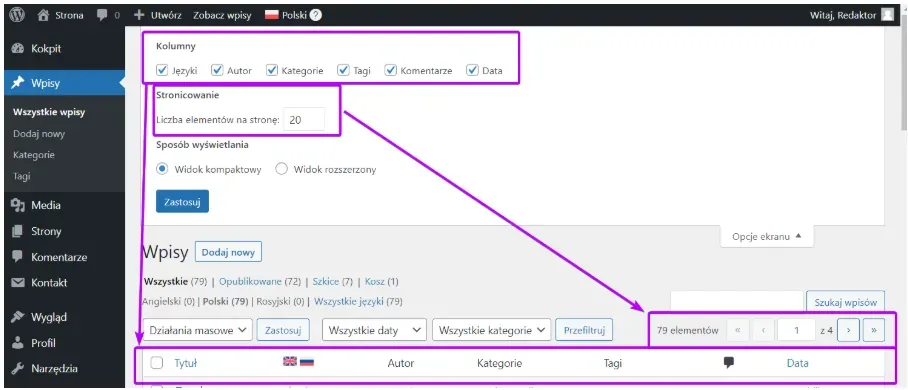
In Screen Options, you can change the number of items displayed, define the visibility of certain columns, and switch to a compact view.
Searching, filtering and sorting posts
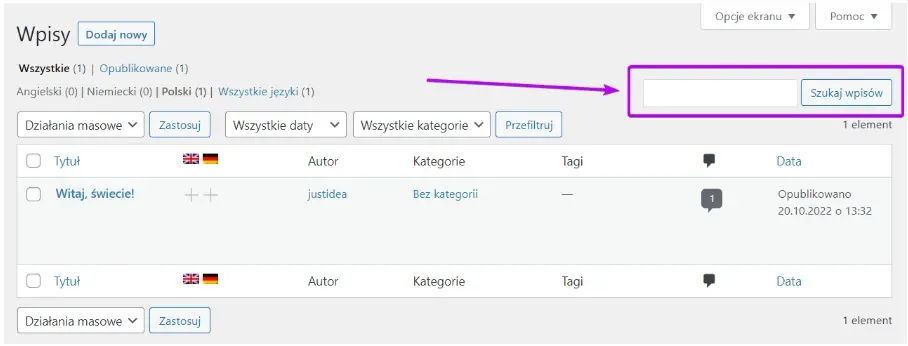
WordPress's post search searches both post titles and their content. You'll find it here:
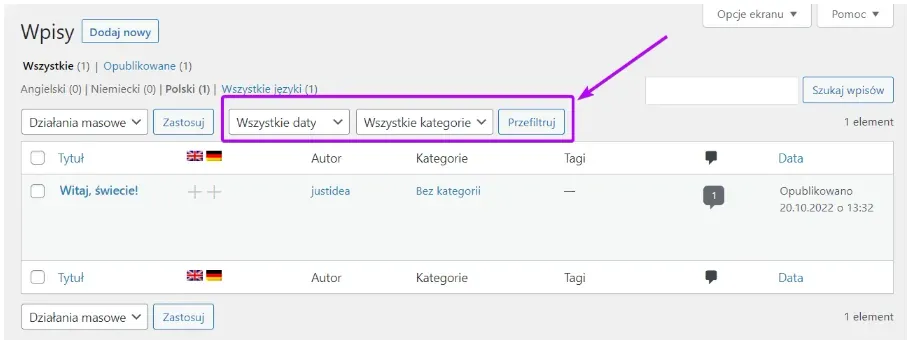
The filtering mechanism lets you display posts published in a given month and/or assigned to a given category (if you don't use categories on your blog, this second type of filtering won't be useful).
When you hover over some of the column headers in the table showing all posts, an arrow appears. Clicking it changes the sort order of the posts.
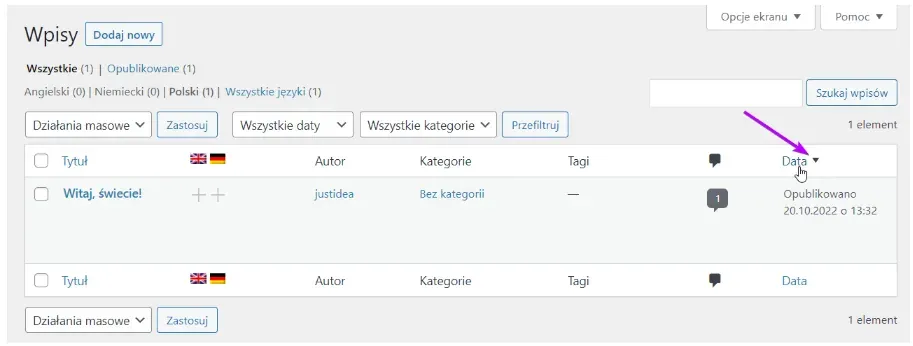
NOTE! Changing the sort order only affects how items are displayed in the admin panel. It does not affect the order items are displayed on the site. If you want to change the display order on the site, contact your web developer.
Site pages in the WordPress admin panel
Adding a new page
You add a new page in a similar way to a new blog post. The only difference is that you can't add a new page from the Dashboard.
- In the top toolbar, select New > Page
- In the admin panel, in the left-hand menu, select Pages > Add New
- In the admin panel, after going to the Pages page, click Add New
Browsing, searching, filtering and sorting pages
This mechanism works identically to blog posts. The main difference is that pages don't have categories or tags, so there's no way to filter or sort using that metadata.
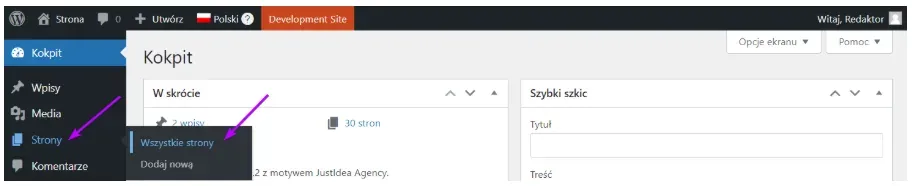
To see all pages, click Pages in the admin panel's sidebar menu, or select Pages > All Pages.
Standard post or page editing
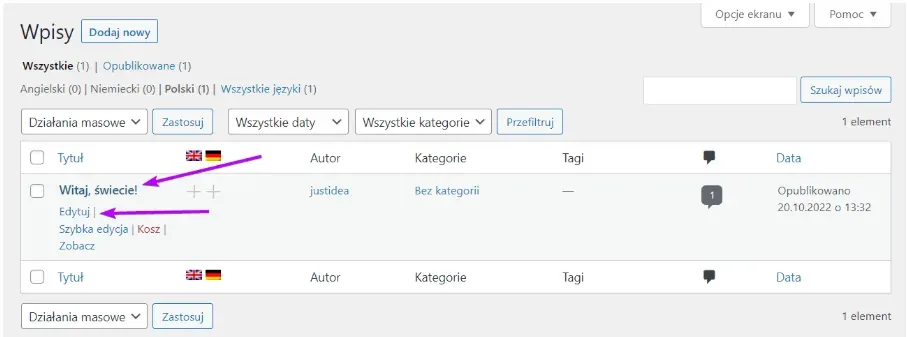
To edit a chosen post or page, click its title in the list of posts or pages (or the Edit command that appears when you hover over the post or page title).
If your WordPress supports several language versions and the post or page has a version in other languages, you can go to editing that language version by clicking the pencil icon under the relevant flag.
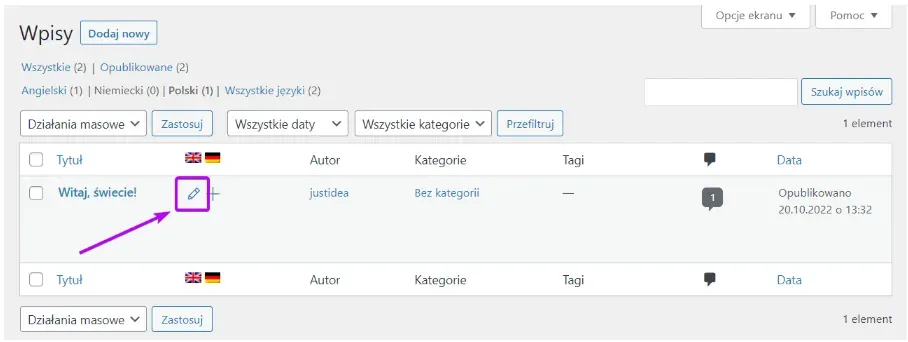
NOTE! If the pencil icon isn't active, it means you don't have permission to edit translations. Contact the web master who built your site and ask them to grant you these permissions.
The rest of this section presents WordPress's standard post and page editing options. Keep in mind, though, that in your version of WordPress, posts or pages may contain other, additional fields you can edit.
Title field
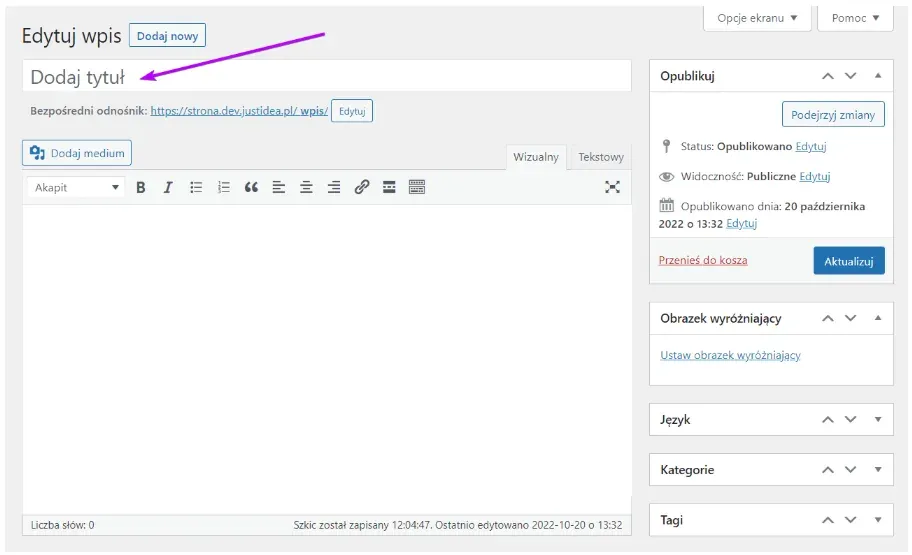
Defines the post's title.
Permalink
Shows what the URL of the post or page will look like.
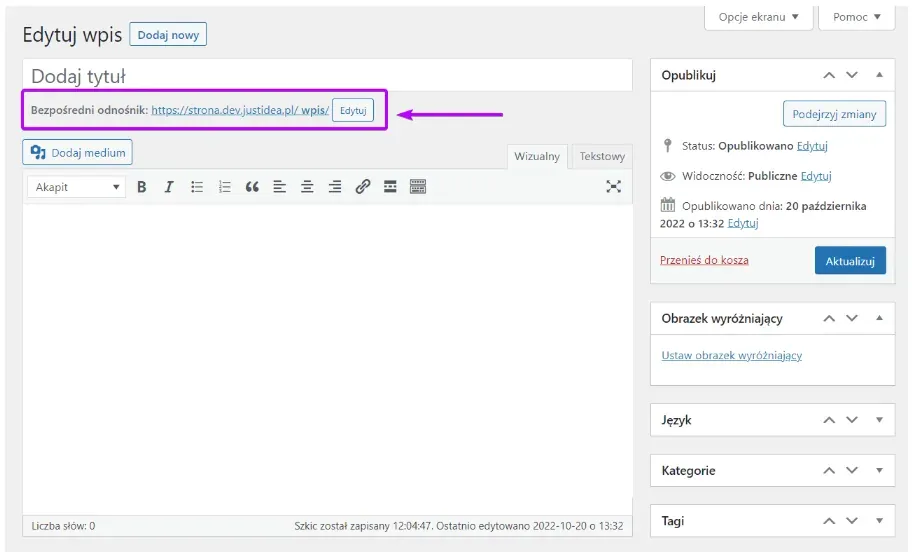
NOTE! Immediately after creating a post or page, this field is invisible. It only appears once you've entered a title.
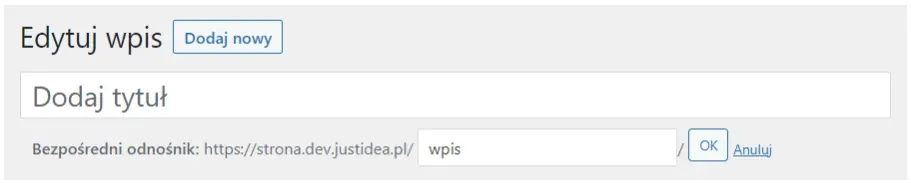
The last part of the permalink, the so-called slug (in the screenshot this is the word "post"), is generated automatically from the title of the post or page. You can, however, edit it by clicking Edit. NOTE! If you edit the permalink, don't use accented characters or other special characters in it, and replace spaces with hyphens.
Content editor
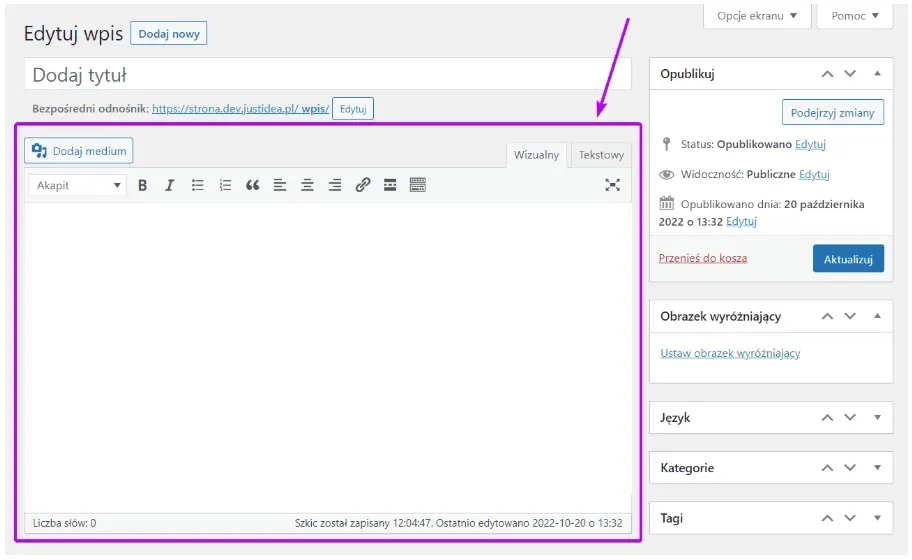
Lets you enter the main content of the post or page.
NOTE! In your version of WordPress, some page templates may have the standard content editor disabled.
Three important notes:
- Although the editor lets you format text (bold, italics, creating lists and so on), if a given formatting option wasn't included in the site's design, it may not display (for example, if the design didn't include bulleted lists, they won't appear on the site). If it turns out you need some kind of content formatting, consult your web developer.
- The editor lets you add headings to the content. We recommend using this option carefully, as using the wrong heading level in the page content can negatively affect that page's SEO.
- You can paste previously formatted text into the editor (e.g. from MS Word). We don't recommend doing this, as text formatted in such a program may display incorrectly on the site (e.g. it may force the use of fonts that aren't loaded on the site).
Publishing and other actions on a post or page
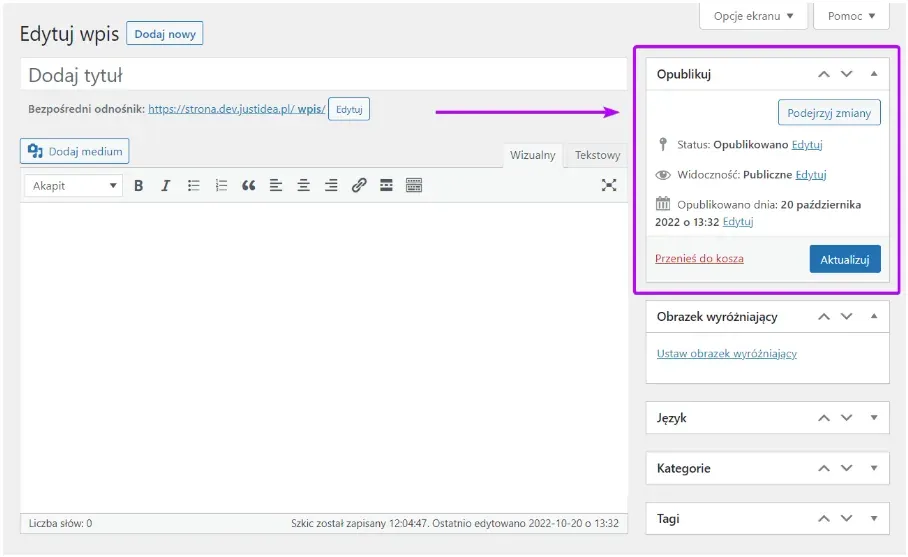
The Publish widget lets you manage the publication status of the post or page and is used to save the changes you make.
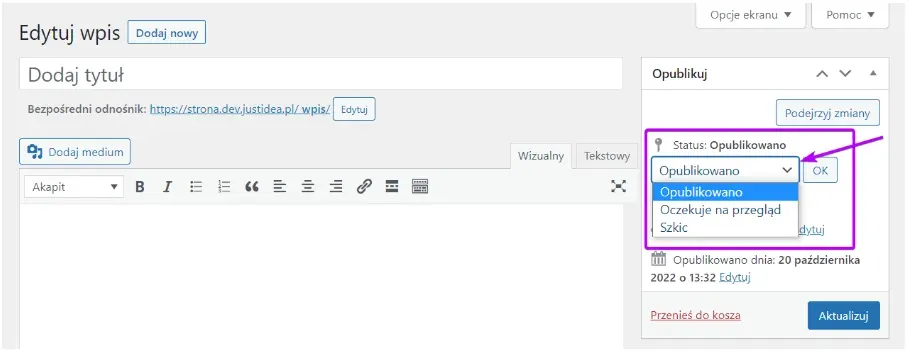
A post or page can have one of the following statuses:
-
Draft: means the post or page is still being written,
-
Pending Review: this status is mainly useful when you have several content authors and editors who proofread that content. As the name suggests, a post or page with this status has already been written and is waiting for approval,
-
Scheduled: this status appears if the publication date of the post or page is in the future (more on this later in this guide),
-
Published: the post or page is visible to everyone who visits your site (unless it has a different visibility setting). Remember that you can edit a published post or page at any time.
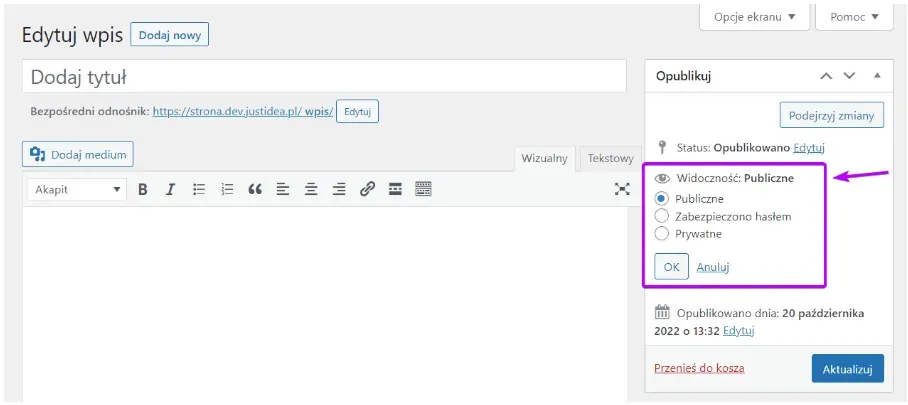
Visibility is a separate property of a post or page, and it can have one of three values:
-
Public: the default value; the post or page is visible to everyone who visits your site,
-
Password Protected: the post or page is visible to everyone, but a password is required to see its content,
-
Private: the post or page will only be visible to people logged into the admin panel.
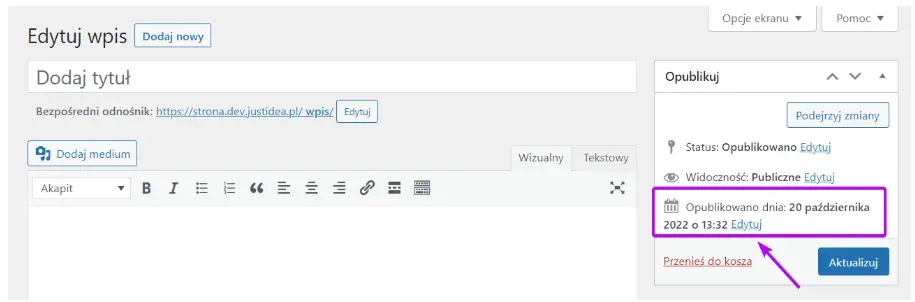
Another property of this widget is editing the publication date. You can choose a date in either the past or the future.
This second option is useful when you want a post or page to publish automatically at a time of your choosing.
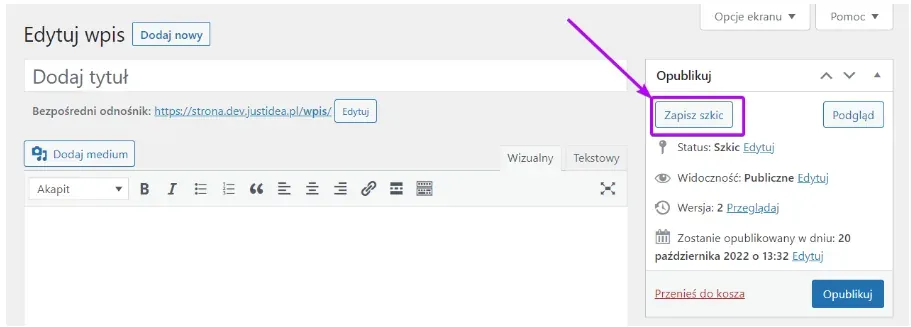
If a post or page is still being written (it hasn't been published), you can save the changes made to it using the Save Draft button.
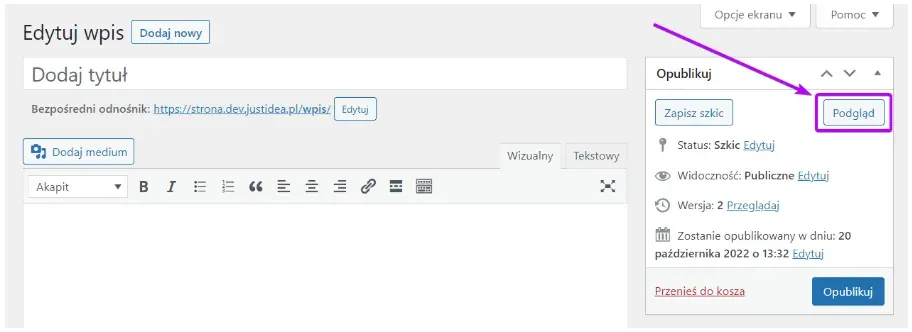
The Preview or Preview Changes button (the button's name varies depending on the post or page's status) lets you see how the post or page will look once published. The button doesn't save the changes made to the post or page, and it doesn't publish it.
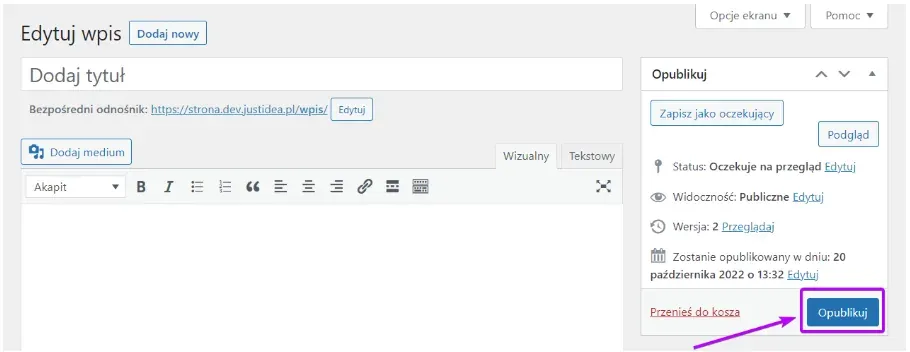
The Publish button changes the status of a post or page that was a draft or pending review to published.
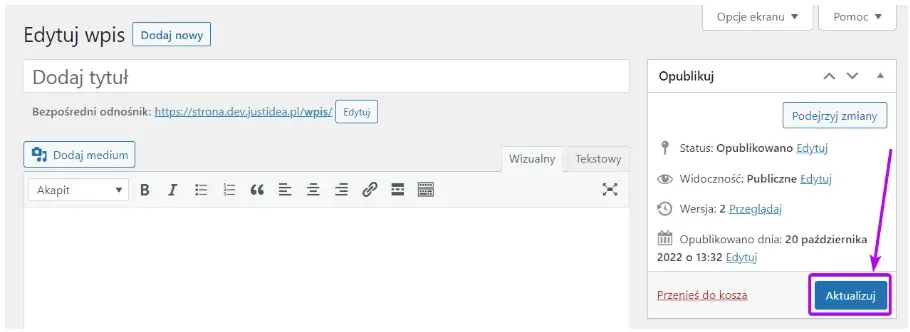
The Update button appears on published posts and pages. It lets you save the changes you've made.
Restoring a previous version of a post or page
WordPress keeps a history of all changes made to a post or page and lets you restore previous versions. Keep in mind, though, that the restore mechanism isn't perfect, and changes to certain things may not be recorded by the system and therefore may not be possible to restore later.
The Revisions widget is used to restore previous versions. By default, it's located below the content editor for the post or page. If it isn't there, check whether its visibility is enabled in Screen Options, whether it's been moved elsewhere in the interface, and whether it's collapsed.
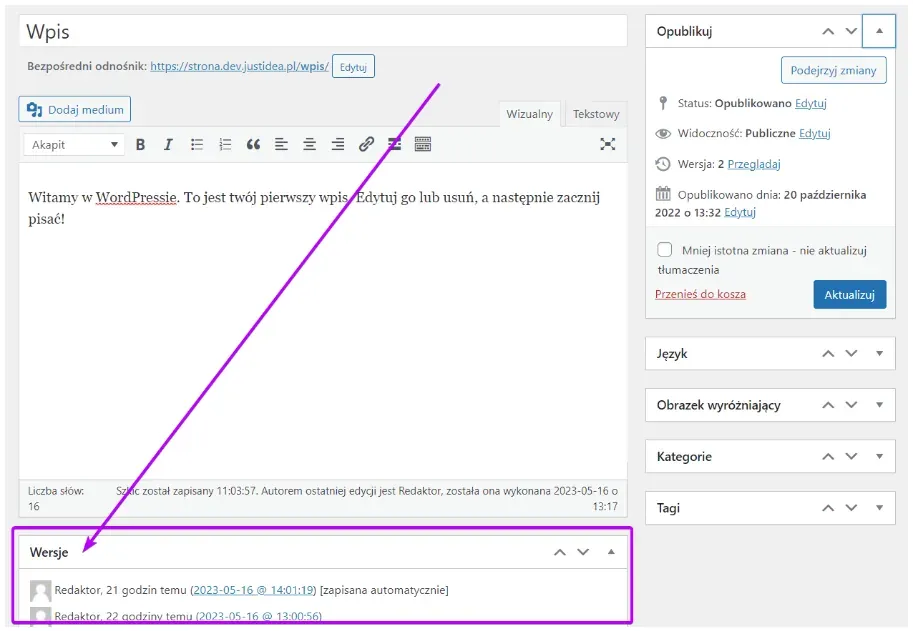
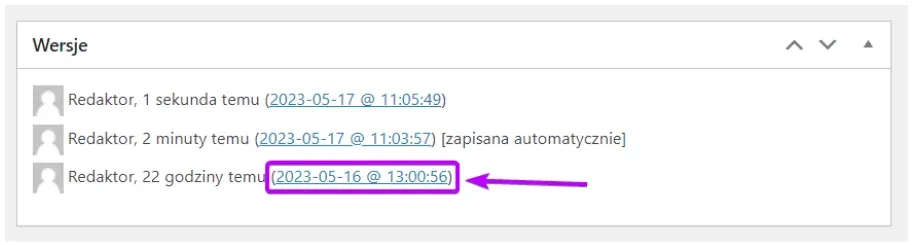
To restore a version, click the timestamp of the chosen version.
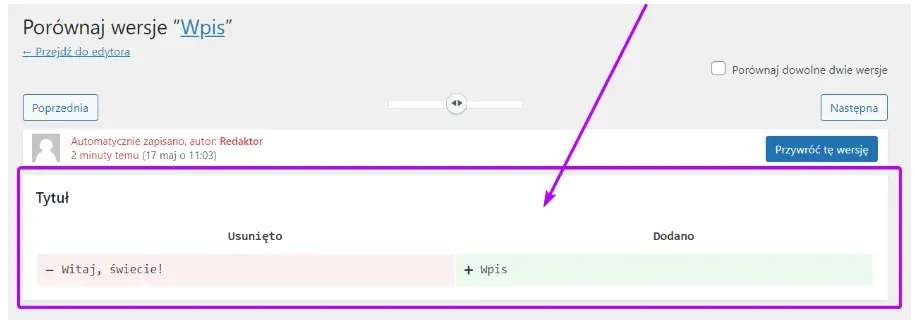
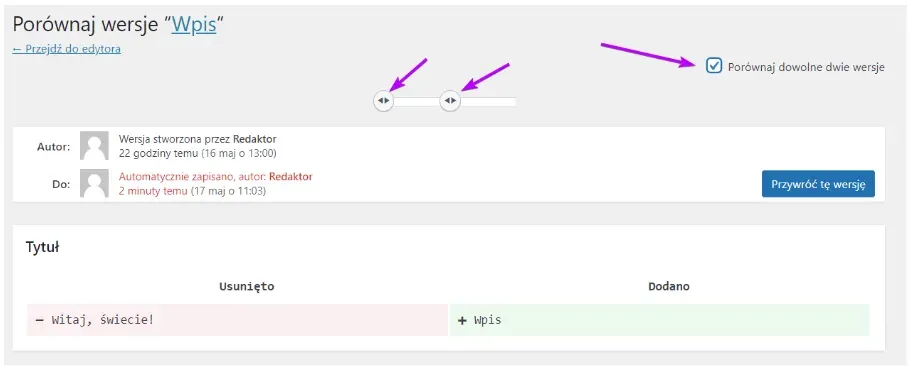
You'll be taken to a page that lets you compare the current and earlier versions of the post or page. The main part of the window shows a comparison of both versions.
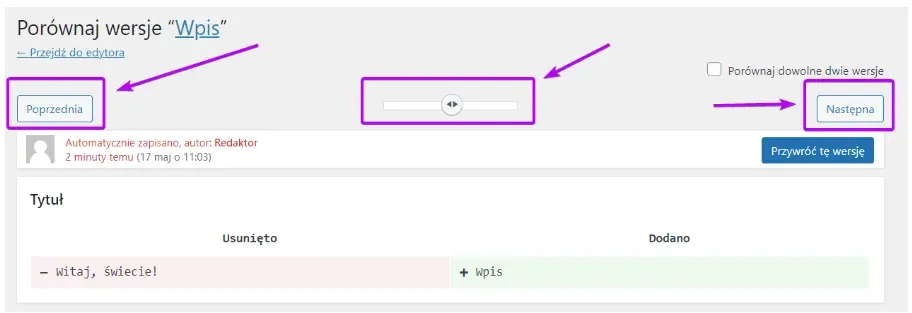
You can easily switch to another archived version of the post or page using the Previous and Next buttons or the slider.
By default, WordPress compares the current version with archived ones. You can, however, enable comparing any two versions. To do this, tick the Compare Any Two Revisions checkbox, which adds two markers to the slider that let you choose which versions of the post or page you want to compare.
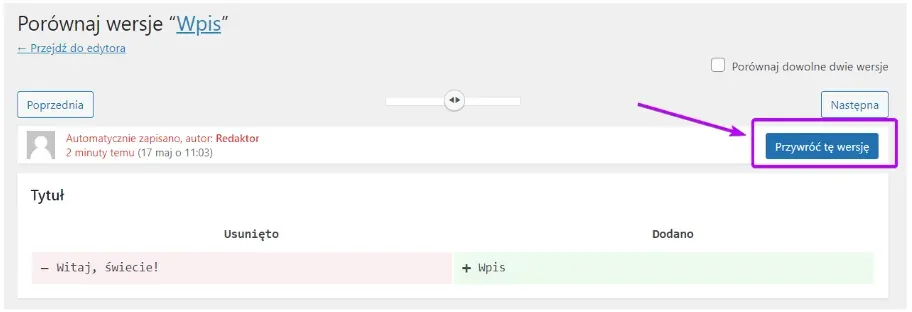
The Restore This Revision button is used to restore the chosen version of the page.
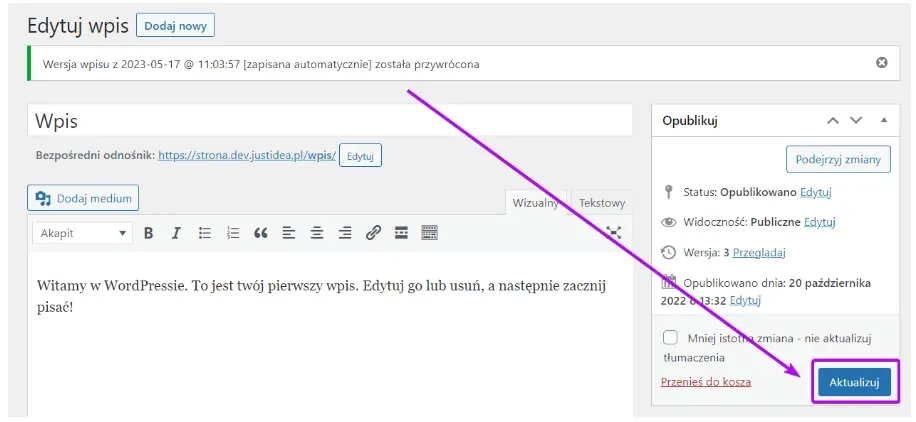
After clicking the button, you'll be taken back to the post or page editor. To confirm the restore, click Update.
Deleting a post or page
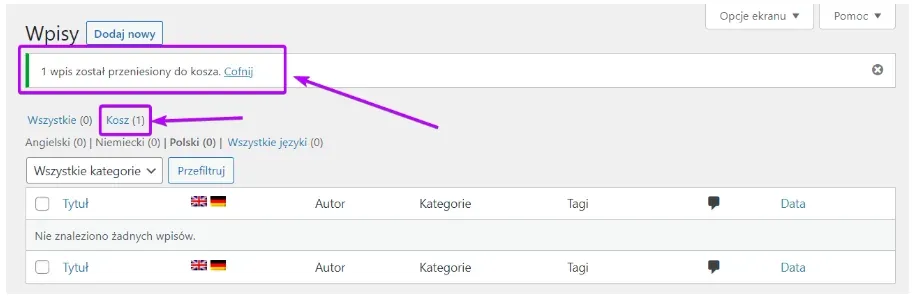
The Move to Trash button deletes the chosen post or page. Such a post or page stops being visible on your site and in the list of posts/pages.
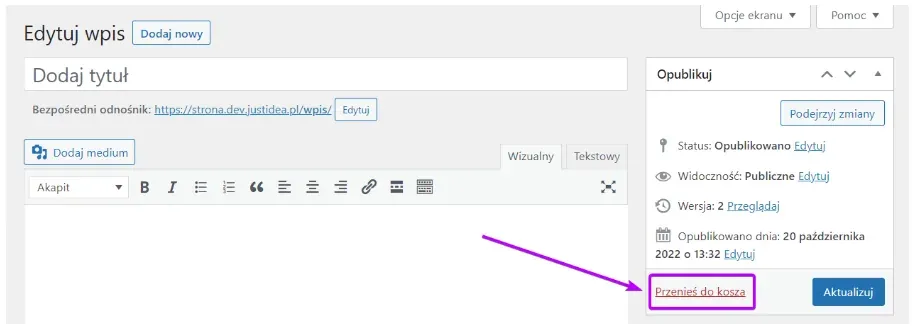
After deleting, you'll be taken to the page listing all posts or pages. Right after deletion, a button will be visible that lets you undo the deletion.
In addition, a deleted post or page is kept in the Trash for some time, from where you can restore it.
Managing other language versions of posts and pages
Creating a new language version
The WPML plugin is used to create other language versions.
You can create a language version of a post or page in several different ways. Because there are so many options, this guide presents one method, the one we recommend most.
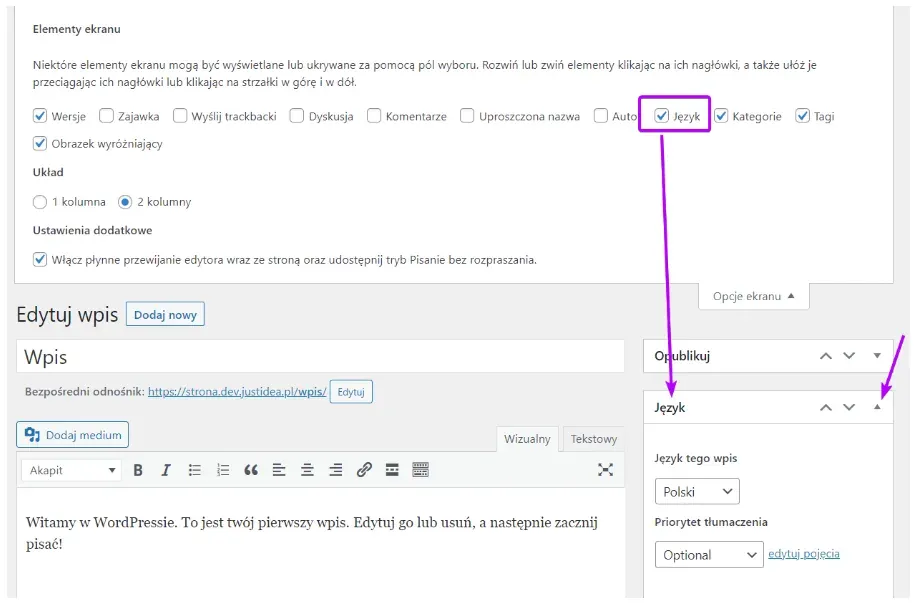
Go to editing the chosen post or page and find the Language widget.
If you can't find this widget, check whether its visibility is enabled in Screen Options. It's also possible that the widget is collapsed or is located somewhere else than shown in this guide's screenshots.
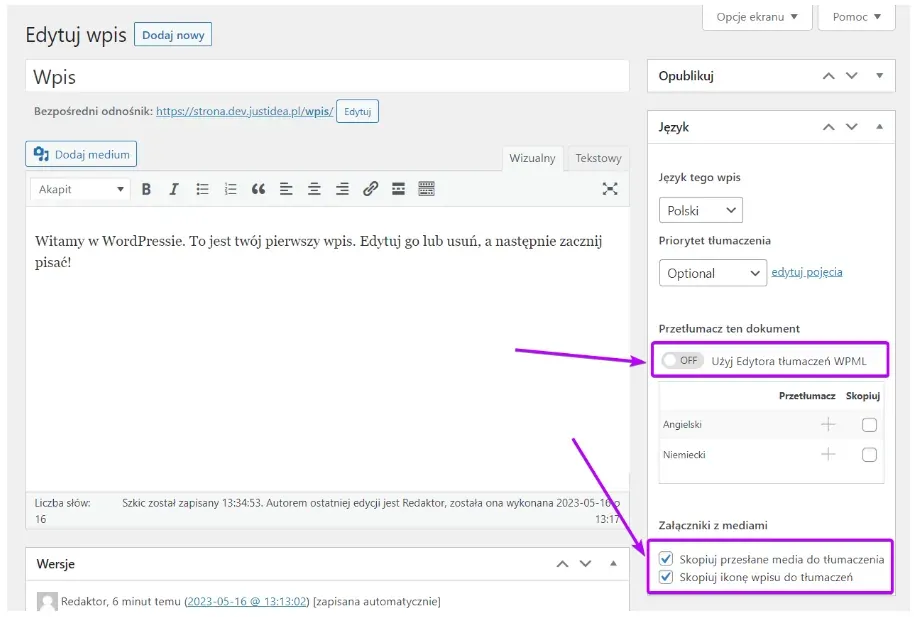
Before you start translating, it's important that the Use WPML Translation Editor option is unchecked in the translation widget, and that Copy Uploaded Media to Translation and Copy Featured Image to Translations are checked.
In the table of languages supported by your WordPress, tick the Copy checkbox next to the language you want to create a version for.
Once you tick the checkbox, a Copy button appears below the table. Clicking it creates a duplicate of the post or page, but assigned to a different language.
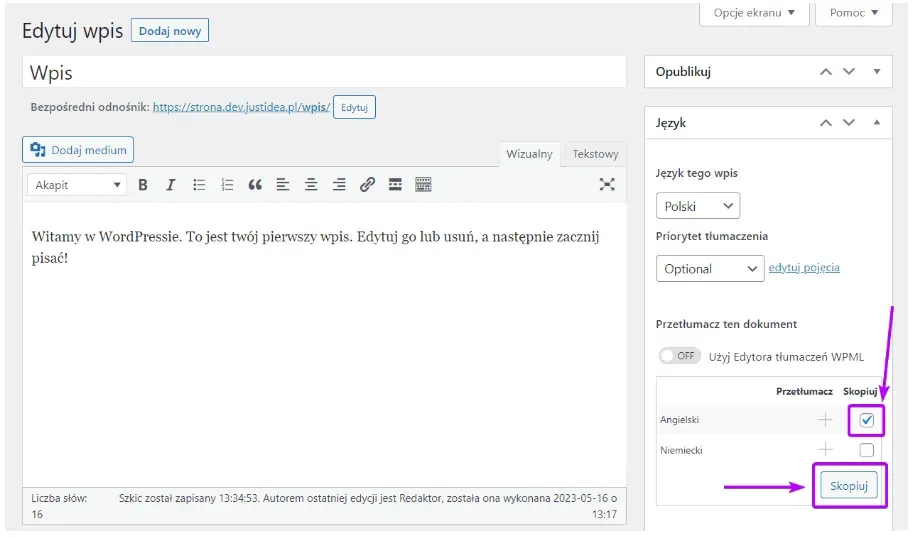
This means that if you create an English duplicate while viewing the Polish version of a post, that duplicate will initially be filled with content in Polish.
Creating the duplicate, however, copies not just the text but also the media and all the other additional properties of the post or page.
First edit of the new language version
Once the duplicate has been created, the option to switch to editing the other language version will appear in the Language widget. To start editing, click the pencil icon.
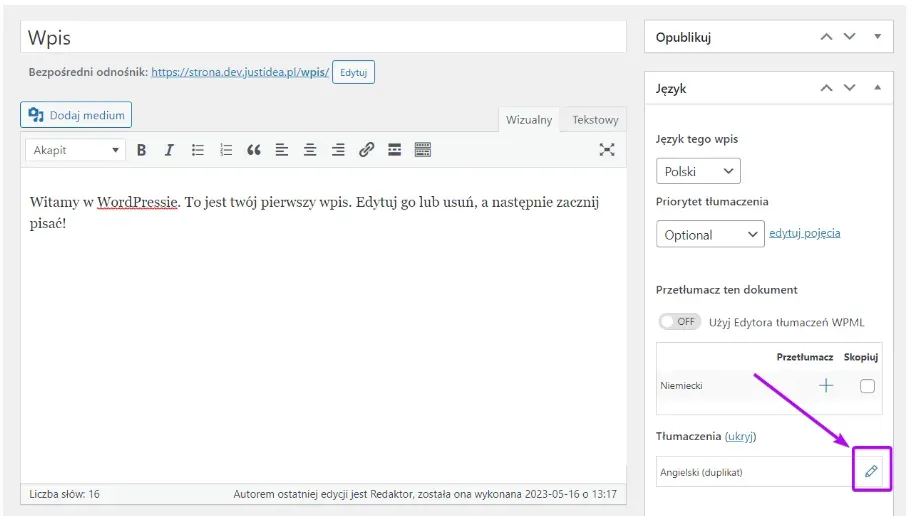
NOTE! If the pencil icon is inactive, it means you don't have permission to edit translations. Contact the web master who built your site and ask them to grant you the appropriate permissions.
The first time you go to edit the post or page in another language, click the Translate Independently button. If you don't do this, every time you modify the main language version, the content in the other language versions will be replaced with content from the main one.
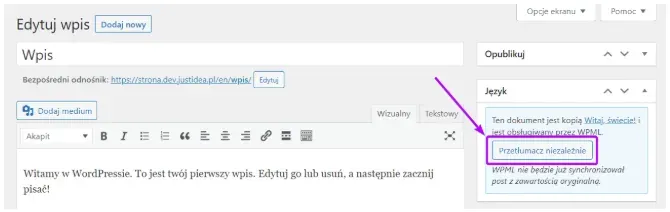
Editing the rest of the content works the same as for any other post or page.
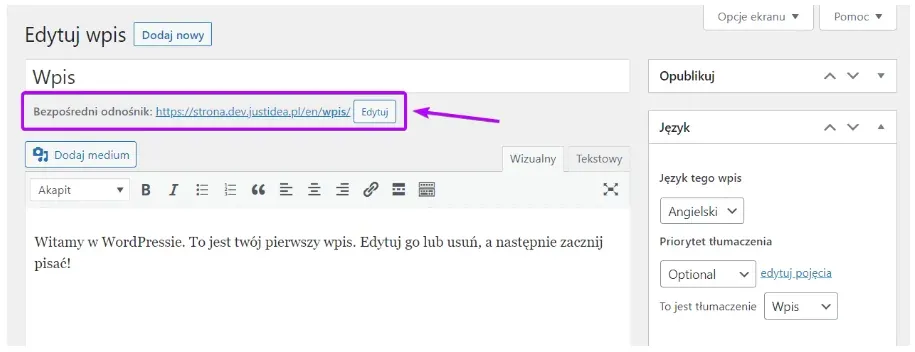
During the first translation, remember to translate the slug in the permalink too, as it will initially be the same as in the original language.
How to organise categories and tags in WordPress: a guide to content structure
NOTE! The functionality described in this section is only useful for page templates that support categories and/or tags.
Adding a category to a blog post
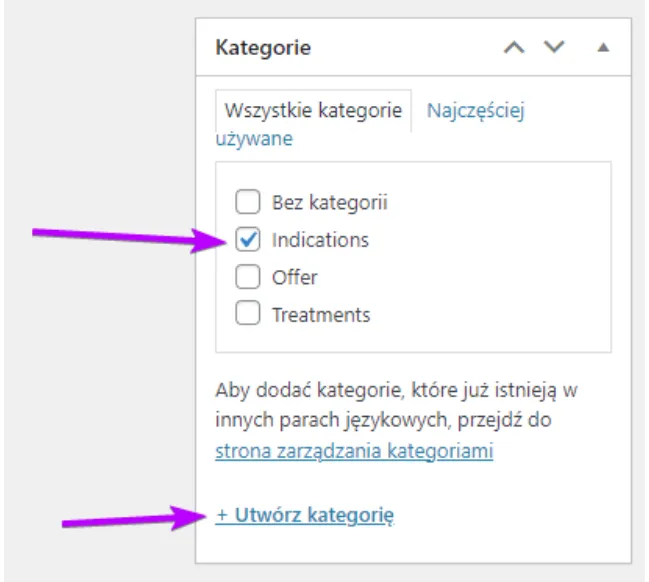
To assign a post to a category, go to editing it and find the Categories widget in the editor window (if it's not visible, enable it in Screen Options).
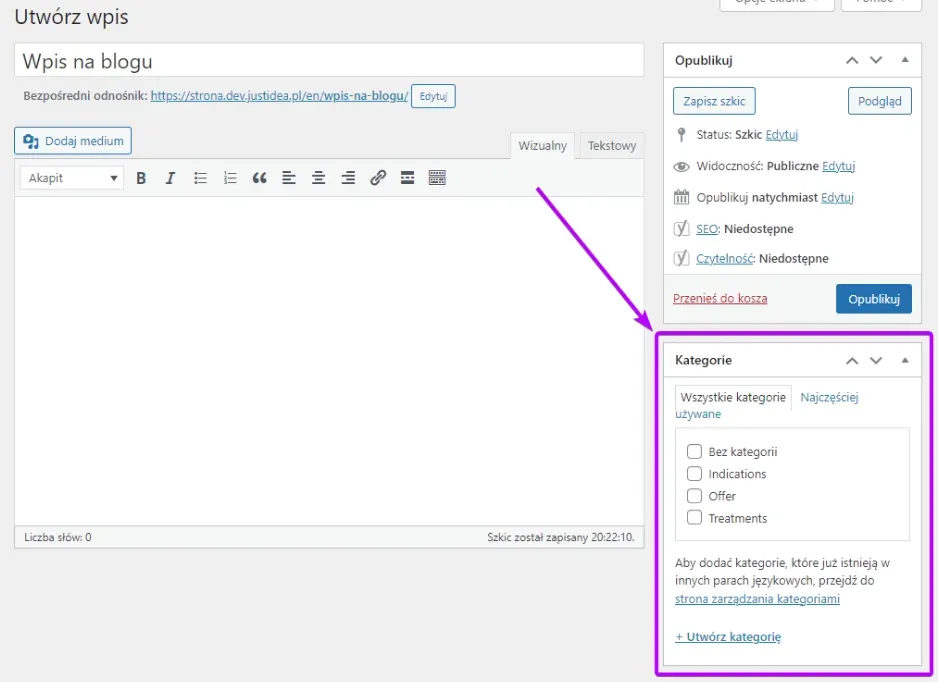
You can add the post to an existing category by ticking the checkbox next to that category. You can also create a new category by clicking + Add New Category.
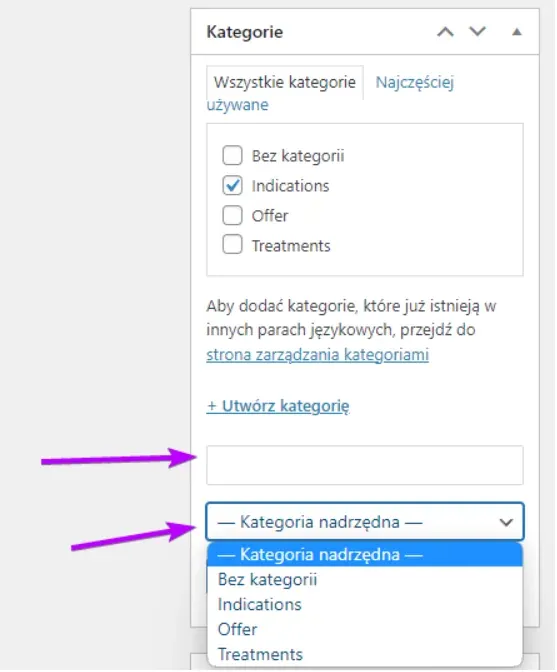
After clicking + Add New Category, a window appears where you can enter the new category's name and decide whether it's a top-level category or a subcategory of another category.
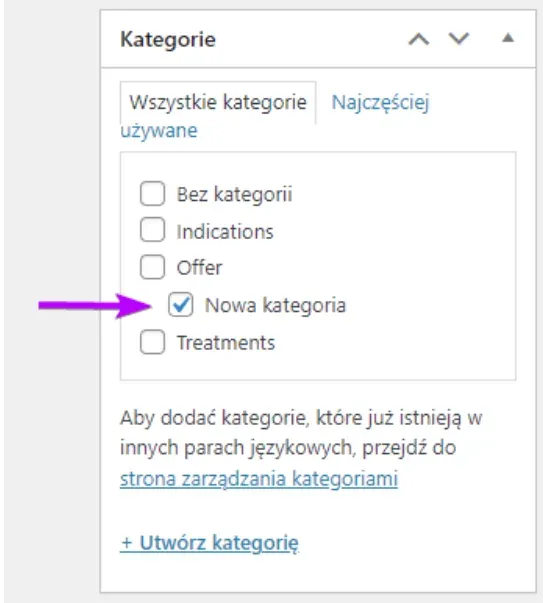
If a category is a subcategory of another category, it will be shown indented in the category list.
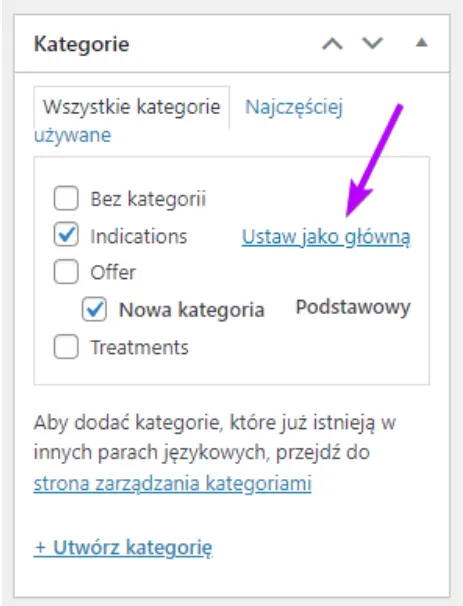
You can assign each post to any number of categories (though you shouldn't overdo it!). If you select more than one category, you'll be able to specify which category is the post's primary category.
Adding a new tag
To add tags to a post, go to editing it and find the Tags widget in the editor window (if it's not visible, enable it in Screen Options).
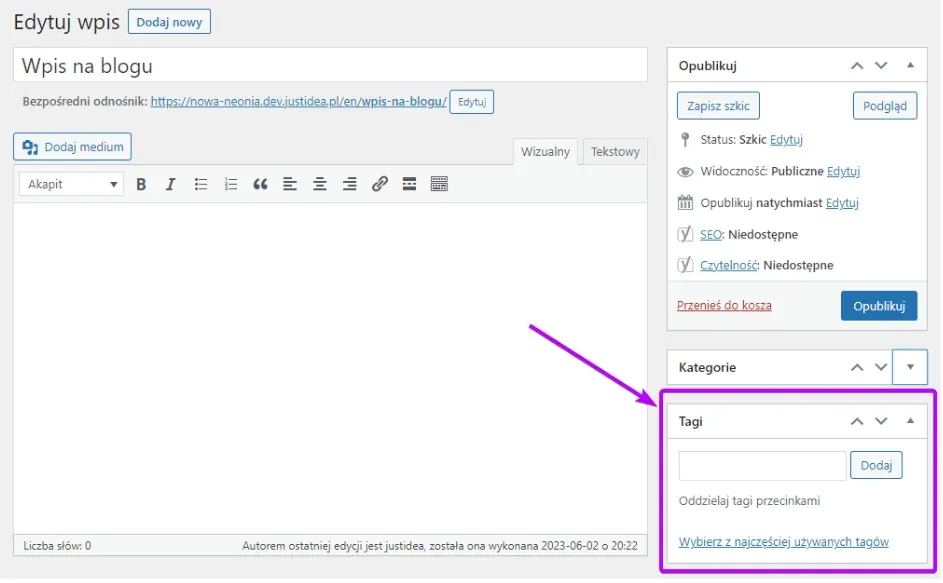
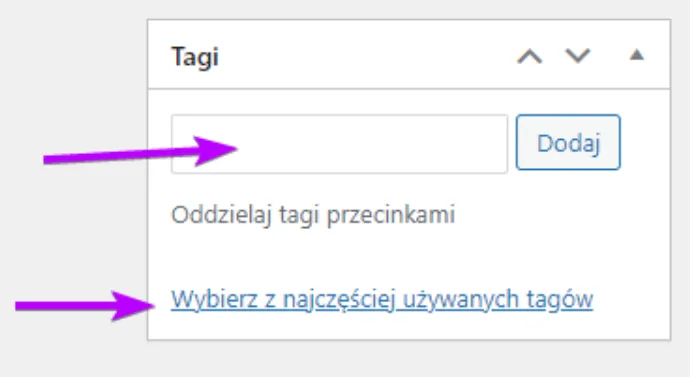
You can add tags in two ways: by typing your chosen phrase into the text input box, or by clicking the Choose from the Most Used Tags button.
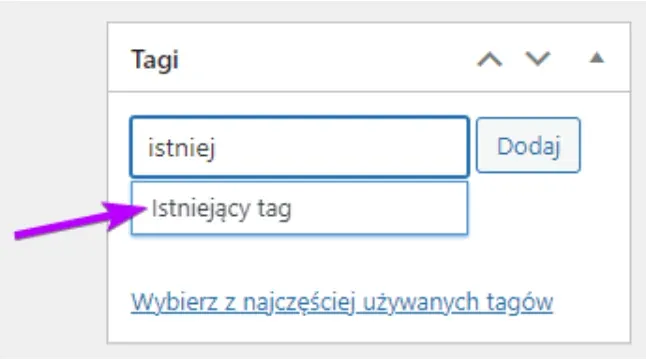
The text input box suggests existing tags or lets you enter new ones.
You can enter any number of tags into the text input box, separated by commas.
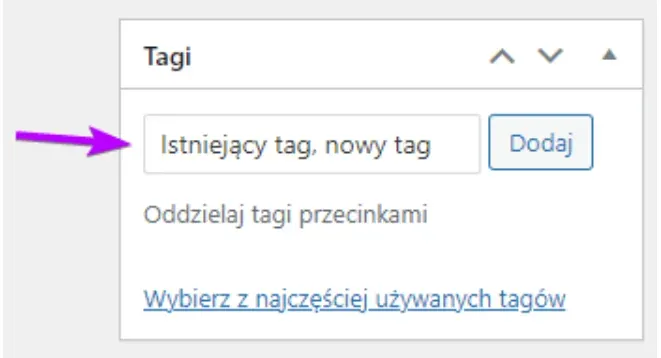
After pressing Enter or clicking Add, the tags will be added.
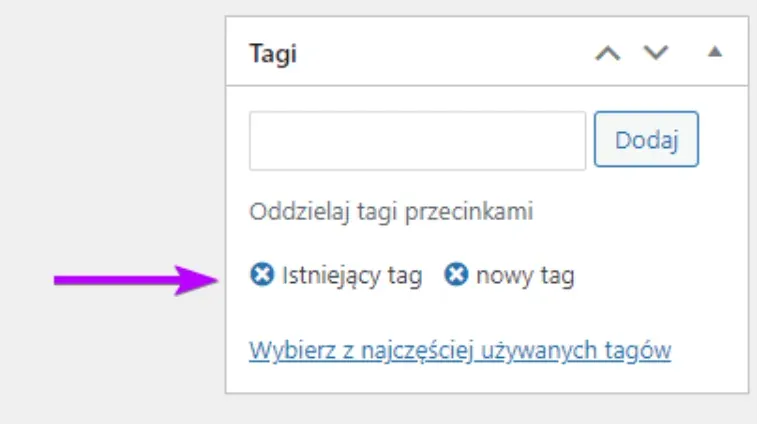
If you want to remove a tag assigned to a post, click the X icon next to that tag.
Managing categories and tags
To manage categories and tags, select Posts > Categories or Posts > Tags in the admin panel's sidebar.
In both cases, the editing mechanics work identically from here on.
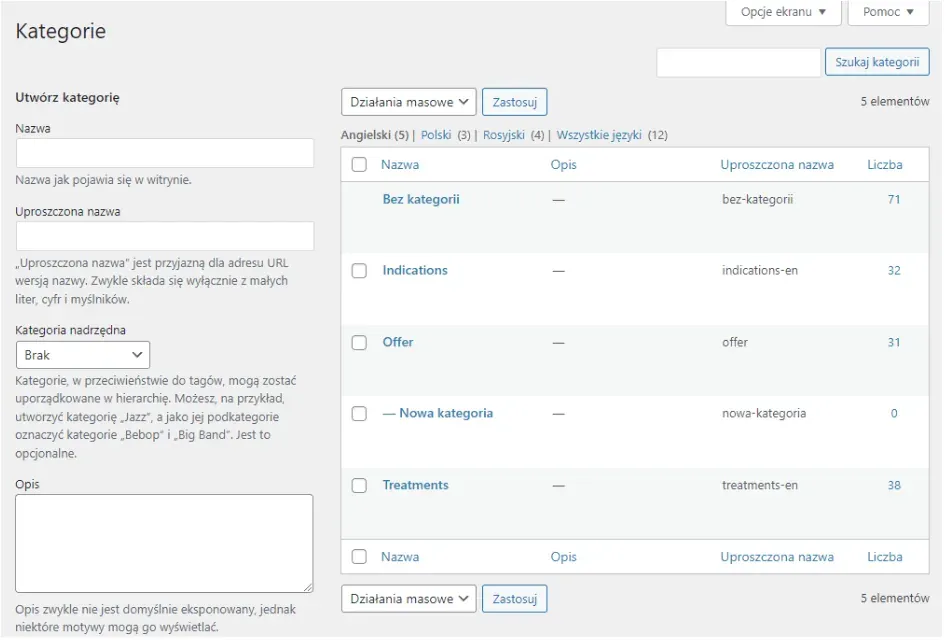
The left-hand part of the panel lets you create a new category or tag. In the name field, enter the display name. In the slug field, enter the slug, i.e. the text that will appear in the tag's or category's URL. Remember not to use accented characters or other special characters in the slug, and replace spaces with hyphens.
When creating a category, you can also specify whether it's a subcategory of another category. The Parent Category field is used for this.
An additional option is the Description field, where you can enter a more detailed description of the tag or category. Keep in mind, though, that if your site's template doesn't display these descriptions, they won't be visible on the site.
Clicking the Add New Category button saves the changes and creates the new category.
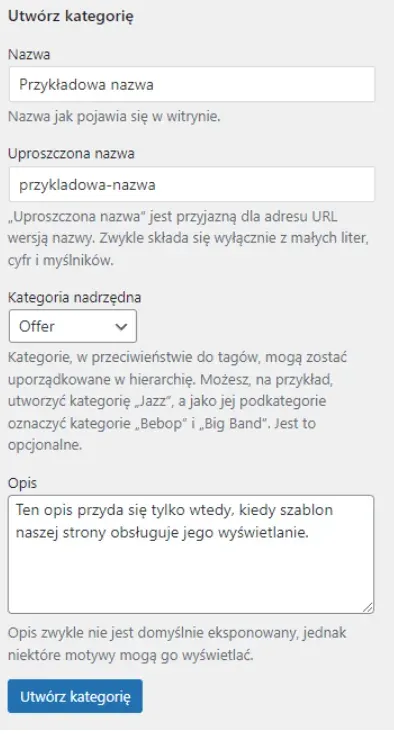
The main part of the panel shows a list of existing categories or tags. The last column in the table, Count, shows the number of posts assigned to that category or tag.
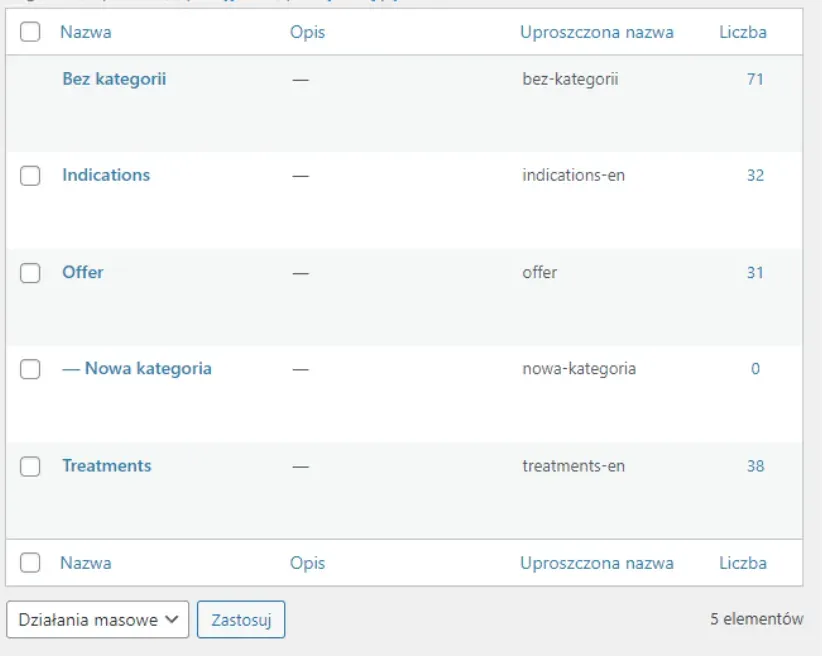
When you hover over a tag or category, additional options appear:
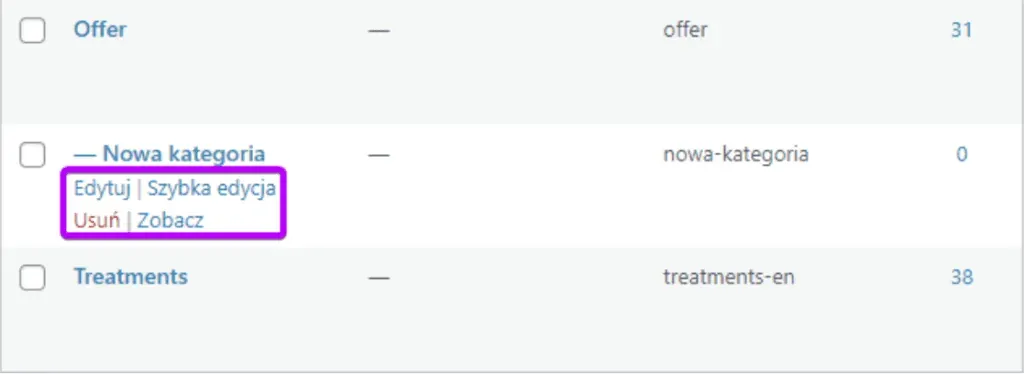
Clicking the Edit button, or the name of the tag or category, takes you to that item's editing window, which looks similar to the panel for adding a new tag or category described earlier.
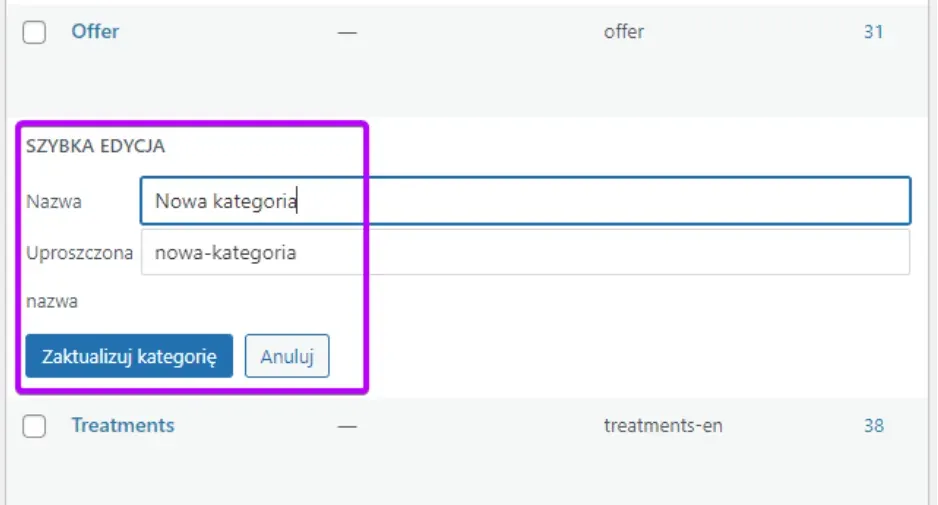
Quick Edit lets you change the name and slug without navigating to another page.
The View button opens the web page showing all posts assigned to that category or tag.
NOTE! If your template doesn't have such a page designed, its content may not display correctly!
The Delete button PERMANENTLY deletes the chosen category or post.
Configuring products in WooCommerce: categories, tags and display options
NOTE! All the functionality described in this section requires the WooCommerce plugin to work!
Adding a new product to the store
You can add a new product in a couple of ways.
- In the top bar, select New > Product.
- In the admin panel, in the left-hand bar, select Products > Add New.
NOTE!!! If you don't see the option to add products, it means you don't have shop manager permissions. Ask the web developer building your site to grant you these permissions.
The page for adding a new product looks similar to the ones for editing blog posts and pages.
Right at the top, there's a field for entering the product name and the URL, where you can edit its last part (the one pointing to that specific product), the so-called slug.

NOTE! The slug should consist of lowercase letters and shouldn't contain accented characters or special characters; replace spaces with hyphens.
In the Product Description field, enter the full product description. The text entered here will be visible on the page presenting that product.
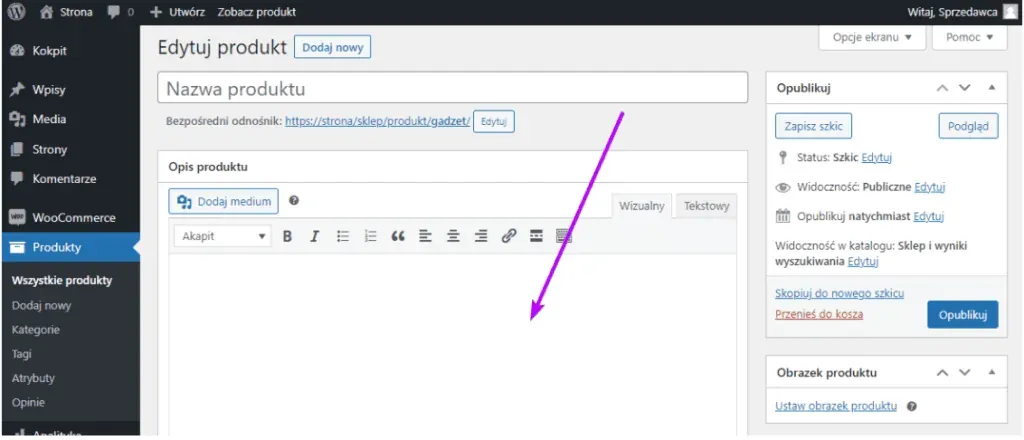
Short Product Description is a separate text field, whose content (depending on the properties of the template you're using) will be shown, for example, as an introduction before the main product description or in search results.
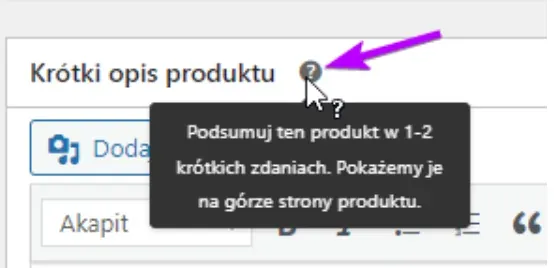
NOTE! WooCommerce has a well-built tooltip system of its own. Many interface elements have question mark icons next to them. If you hover over them, tooltips appear explaining that element's function. Similar tooltips often also appear when you hover over an element or its name.
Another important widget is the one with the product's detailed data.
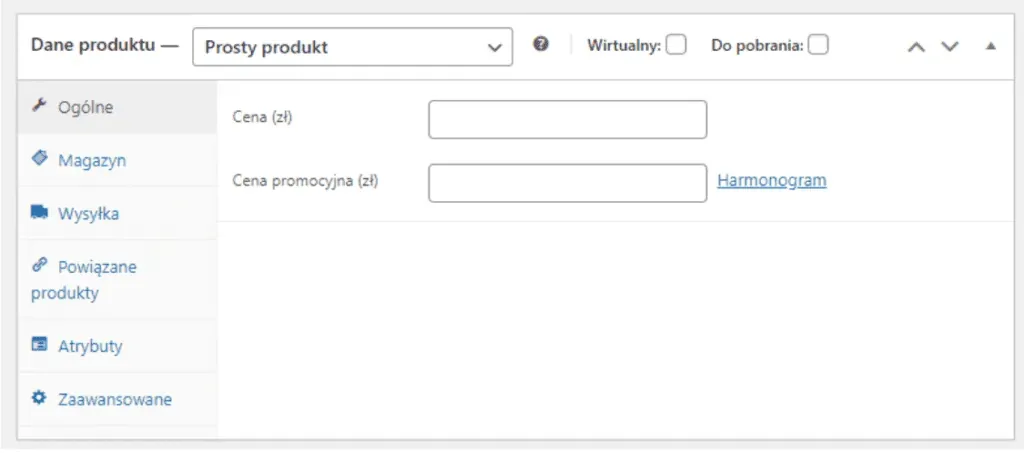
Since this widget's options are well documented by WooCommerce's tooltip system, it won't be described in detail in this guide.
The next thing worth filling in is product photos. In WooCommerce, the main image (which will be visible, e.g. in the product catalogue), the so-called Product Image, is added separately from the remaining photos, the so-called Product Gallery. For the main image, click Set Product Image, and for the gallery, click Add Product Gallery Images.
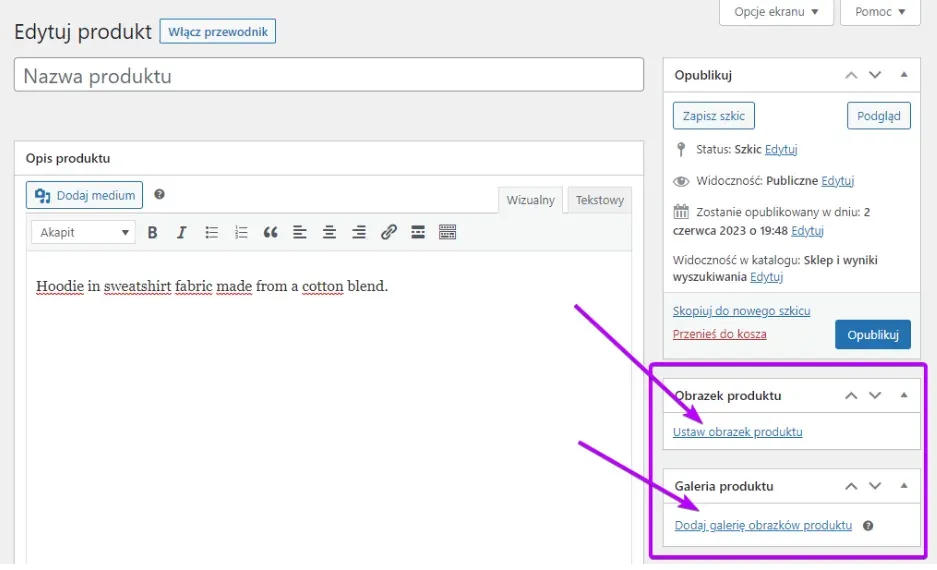
In both cases, you'll be taken to WordPress's standard media selection window, where you can upload a new file or use photos that have already been used on the site.
For Product Image, you can only choose one photo; for Product Gallery, you can choose several.
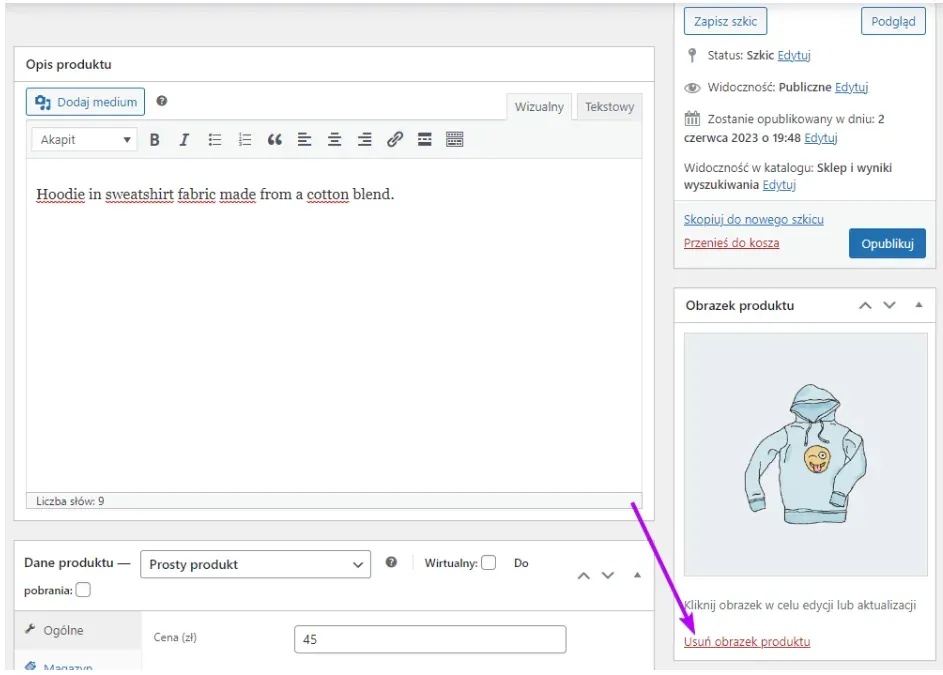
If you want to change the Product Image, you need to remove the one currently assigned to the product. To do this, click the Remove Product Image button, then choose a new photo.
NOTE! Clicking the Remove Product Image button won't permanently delete the photo (it will still be in the media library).
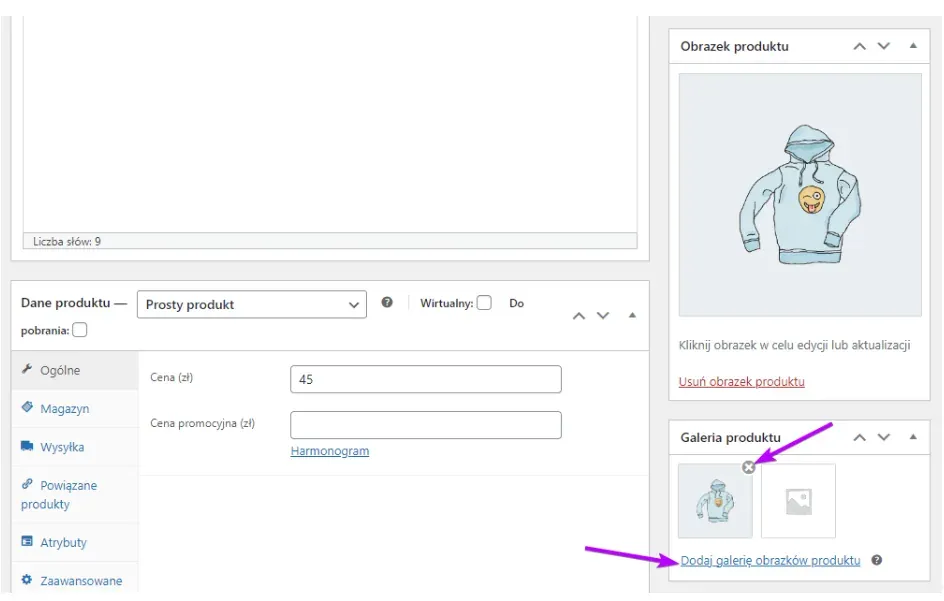
For Product Gallery, you can change the photo order using drag and drop. When you hover over a photo, an X icon appears in its top right corner, which removes that photo from the product gallery (as with the product image, this doesn't permanently delete the photo from the media library). To add more photos to the gallery, click Add Product Gallery Images.
The last thing to do when adding a new product is to assign it to the correct category. If your store's template also supports tags, it's worth filling those in too.
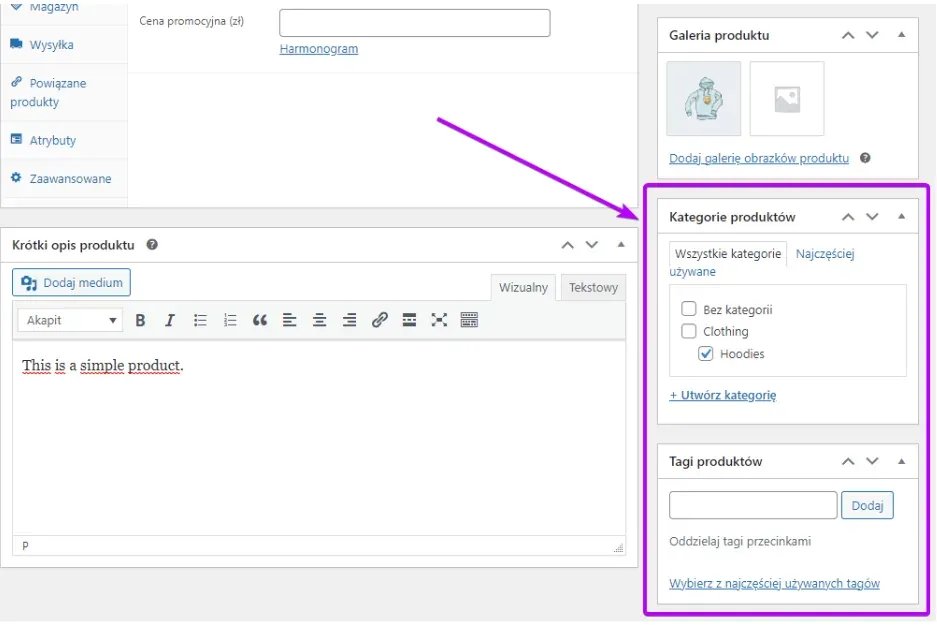
Categories and tags work the same way as they do for blog posts.
When adding a product to a category, you can tick the checkbox next to an existing category or create a new one by clicking the + Add New Category button. You can assign a product to any number of categories, but you shouldn't overdo it.
For tags, it's enough to type any text into the text box. If a tag with that name already exists, the system suggests it.
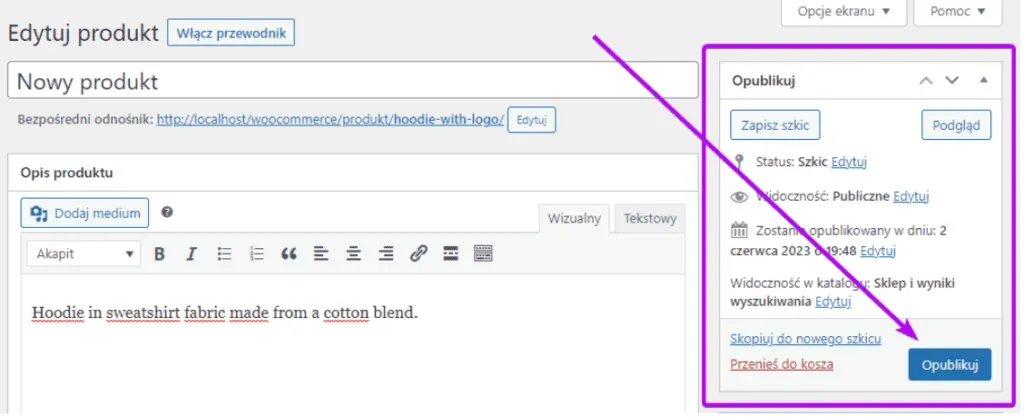
Once you've filled in all the product data, you can publish it or save it as a draft. The Publish widget is used for this, and it works the same way as the one used for publishing pages and blog posts.
Browsing products
To go to the list of all products, select Products in the left-hand menu, or select Products > All Products.
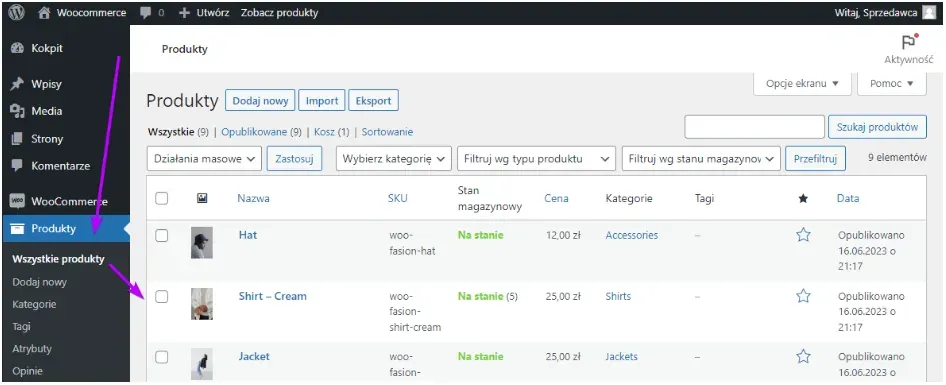
Browsing products works similarly to browsing pages or blog posts.
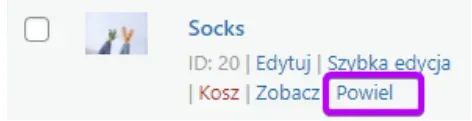
When you hover over a chosen product, you'll see a Duplicate option, which lets you create a copy of the product.
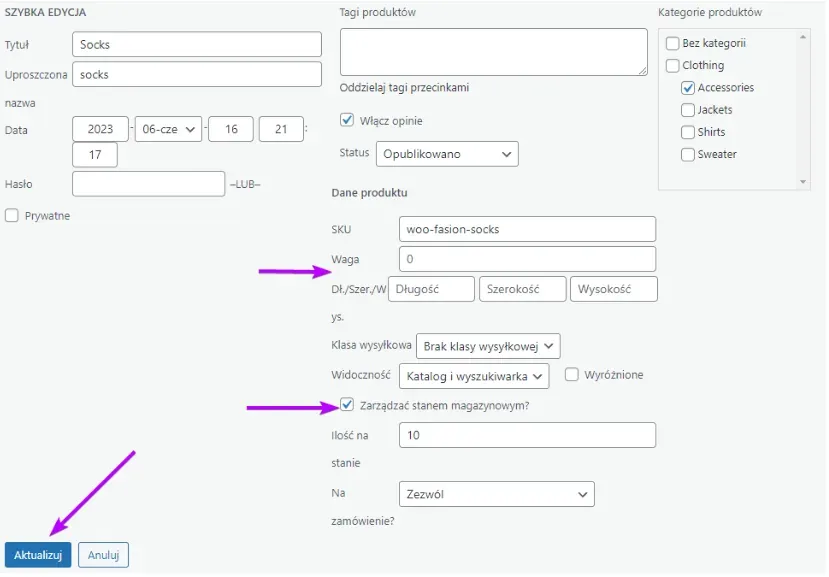
WooCommerce also has an extensive quick edit mechanism that lets you, among other things, specify the product's dimensions and weight and edit stock levels. For this second option to be available, tick the Manage stock? checkbox.
Confirm the changes you've made with the Update button.
Managing orders
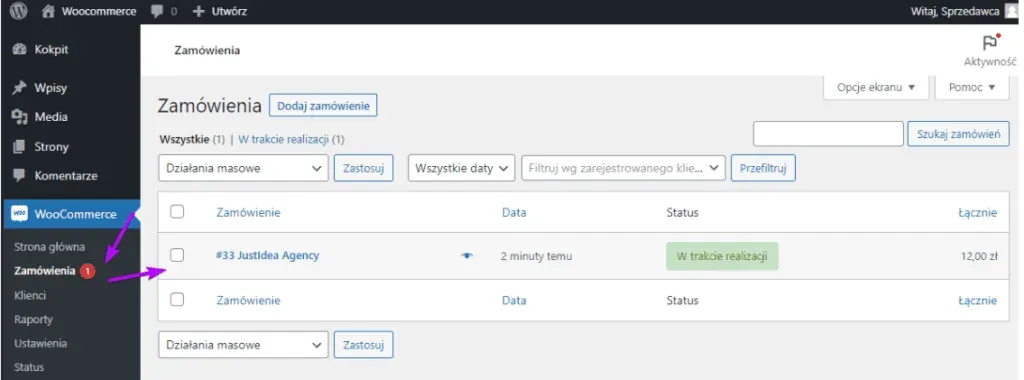
Go to orders by clicking WooCommerce > Orders in the left-hand menu. If there are orders that need your attention, the number of such orders will also be shown next to this item.
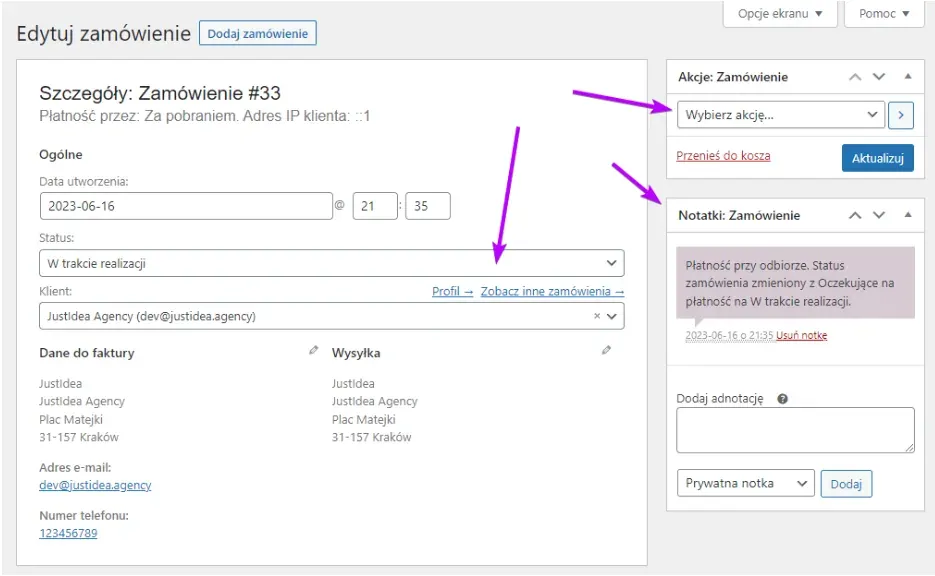
Go to an order by clicking its name in the Order column. In the order panel, you can view detailed information about it and carry out actions such as changing the order status.
The widgets on the right are also useful. The Order Actions widget lets you force the system to send the customer emails with various notifications (if, for some reason, they didn't reach the customer).
The Order Notes widget, meanwhile, shows the order's status history. Here, you can also add your own notes about the order.
Troubleshooting WordPress: common problems and how to fix them
I've forgotten my password
On the login page, use the password reset by clicking Lost your password?
You'll find more information in the Resetting a forgotten password section.
An interface element has stopped being visible
The element's visibility may have been turned off. It may also have been moved elsewhere or minimised.
The Editing the admin panel interface section describes how to change the visibility of this type of element.
I edited the menu, but nothing changed on the site
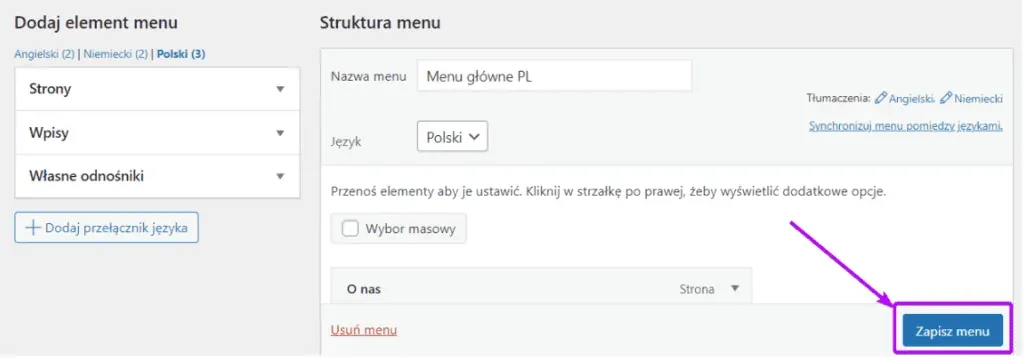
For changes made to the menu to become visible on the site, confirm them with the Save Menu button.
The submenu on the site displays incorrectly
This is most likely because the template you're using on your site doesn't have a submenu mechanism designed into it. To clarify this, consult the web developer who built your site.
Content pasted into the content editor displays incorrectly on the site
This is most likely because the pasted content contained formatting that isn't supported by the site's template.
We recommend pasting unformatted content, then reformatting it in the WordPress editor.
If this doesn't solve the problem, contact the web developer who built your site.
I can't publish a page/blog post: it keeps having the "scheduled" status
This is because the publication date has been changed to one in the future. Changing the publication date to one in the past will let you publish the page or post.
I can't edit different language versions of a page
You most likely don't have permission to edit translations. Contact the web master who built your site and ask them to grant you the appropriate permissions.

Have a question about this article? Write to us.